Sometimes a simple desire for clean, strong, and beautiful furniture in a small apartment turns into a deep appreciation for ancient craftsmanship, and before you realize it, that desire becomes one of the most rewarding woodworking journeys you have ever experienced. This build is exactly that kind of experience. The precision, the elegance, the nail-free strength, and the entire process behind using Sashimono joinery for modern apartment furniture feels timeless, minimalist, and incredibly satisfying.
This project is not just about making furniture. It is something far more special and far more meaningful. The goal here is to create strong, beautiful, space-saving furniture for modern apartments using traditional Japanese Sashimono joinery — no nails, no screws, just perfectly interlocking wood joints that look clean and modern.
That means this project must balance two completely different worlds. On one side, there is ancient Japanese craftsmanship and philosophy of simplicity. On the other side, there is practical modern needs — small spaces, lightweight furniture, easy assembly, and stylish minimalist design that fits today’s apartments.
Welcome to this complete journey of bringing Sashimono joinery into modern apartment furniture.
A few months ago, I was struggling with cheap particle board furniture in my small apartment. It looked okay but felt weak, wobbly, and disposable. I wanted something strong, beautiful, and repairable that would last for years without taking up too much visual space. That search led me to Sashimono — the traditional Japanese art of precise wood joinery. After building my first Sashimono-inspired pieces, my apartment feels calmer, more organized, and genuinely better. This guide shares everything I learned so you can do the same.
Before we start cutting wood, there was something very important that had to happen first.
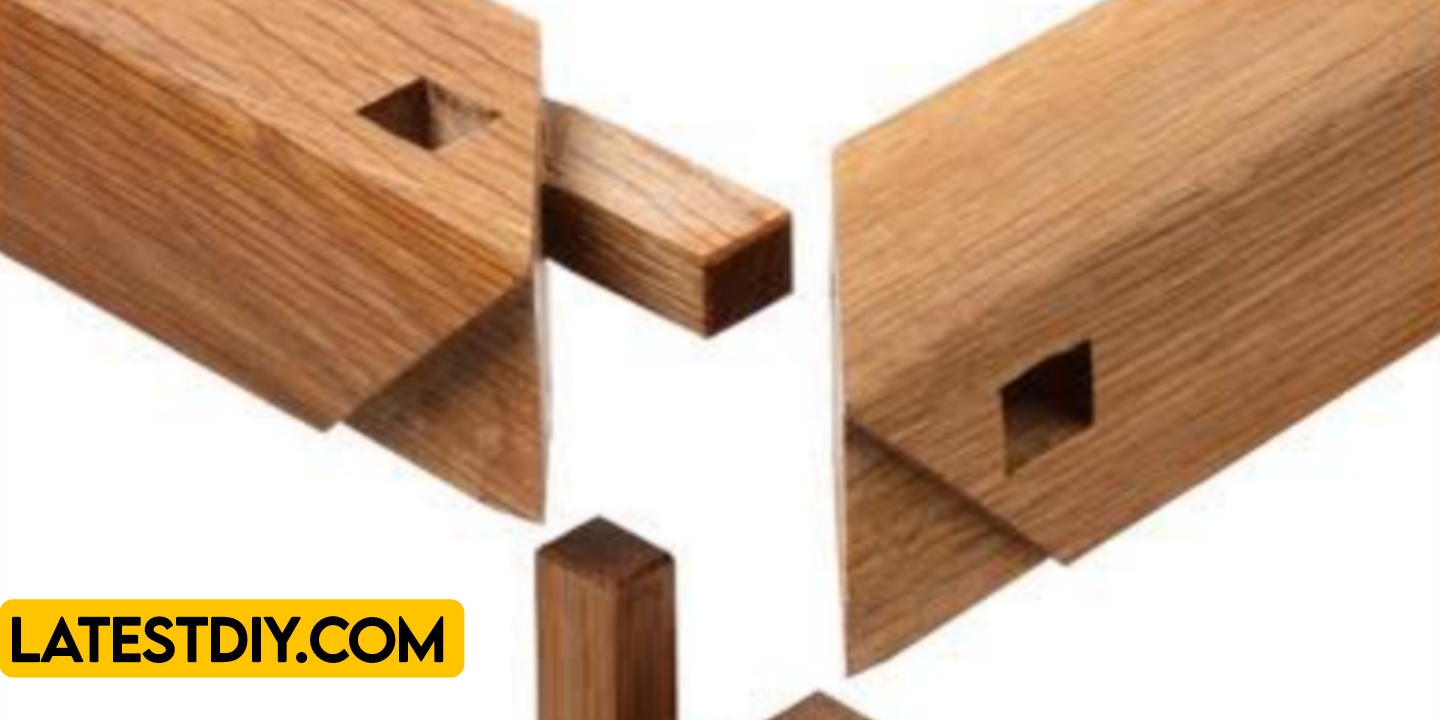
What is Sashimono Joinery?
Sashimono is a traditional Japanese woodworking technique that relies entirely on precise interlocking joints instead of nails or screws. The word “Sashimono” comes from “sashi” (to insert) and “mono” (thing). These joints are so well-designed that they become stronger over time as the wood expands and contracts naturally.
Common Sashimono joints include:
- Through mortise and tenon
- Blind mortise and tenon
- Dovetail variations (ari-kake)
- Half-lap joints
- Mitred joints with keys
- Kumiko lattice patterns
The beauty of Sashimono is its invisibility — from the outside, the furniture looks seamless and clean, perfect for modern minimalist homes.
Why Sashimono is Perfect for Modern Apartment Furniture
Modern apartments are small, often rented, and need furniture that is:
- Strong but lightweight
- Easy to disassemble and move
- Beautiful without being bulky
- Repairable and long-lasting
- Visually light and airy
Sashimono delivers all of this. The joints are incredibly strong, look elegant, and allow furniture to be taken apart if needed. It also respects wood grain and celebrates natural beauty — exactly what minimalist spaces need.
Materials and Tools You Will Need
Wood:
- Hardwoods like walnut, oak, maple, or cherry (straight grain is best)
- Start with 4/4 (1 inch) or 5/4 stock
Essential Tools:
- Sharp hand saws (ryoba and dozuki)
- Chisels (various sizes)
- Marking gauge and knife
- Mallet
- Shooting board
- Clamps
- Japanese pull saws
Optional but Helpful:
- Kanna (Japanese plane)
- Router with straight bit (for beginners)
- Calipers for precision
Total cost for first project (small side table): Around $180–280.
Step-by-Step Project: Building a Sashimono Side Table
Step 1: Design and Planning
I designed a simple 18″ × 18″ × 24″ tall side table. Four legs with through tenons going into the top and lower shelf. This creates a very strong structure while looking extremely clean.
I drew full-scale plans and marked every joint carefully. Precision is everything in Sashimono.
Step 2: Preparing the Legs and Rails
I cut four legs from walnut (24″ long). Then I cut the aprons (rails) to exact length. All pieces were planed flat and square using a Kanna.
Step 3: Cutting the Mortises
This is the heart of Sashimono. I marked the mortise locations on the legs using a marking gauge. Using a drill to remove most waste and then chisels, I carefully cut clean through-mortises. The walls must be perfectly straight and smooth.
Step 4: Cutting the Tenons
On the apron rails, I cut matching tenons. I used a ryoba saw for the cheeks and shoulders. Each tenon was test-fitted multiple times until it slid in with firm hand pressure — no gaps, no looseness.
Step 5: Adding the Lower Shelf
I used a similar through-tenon method for the lower shelf. This creates a strong box structure that prevents wobbling.
Step 6: Final Fitting and Assembly
All joints were dry-fitted first. Once perfect, I applied a tiny amount of glue only on the tenon shoulders (traditional Sashimono often uses no glue at all). I tapped everything together gently with a mallet and soft block.
Step 7: Finishing
I sanded everything to 400 grit and applied multiple coats of tung oil. The walnut glowed beautifully, and the joints looked almost invisible — pure minimalist elegance.
Benefits of Using Sashimono Joinery in Apartments
- Extremely strong and durable joints
- Clean, seamless minimalist look
- Furniture can be disassembled if moving
- Celebrates natural wood beauty
- No visible screws or nails
- Better long-term stability than screws
- Develops advanced woodworking skills
- Creates heirloom-quality pieces
- Eco-friendly (no metal fasteners)
- Looks expensive but costs less
Comparison Table: Sashimono vs Modern Fasteners
| Feature | Sashimono Joinery | Screws & Nails | IKEA-style Cam Locks | Dowels Only |
|---|---|---|---|---|
| Strength | Excellent | Good | Medium | Medium |
| Looks | Seamless & Beautiful | Visible holes | Hidden but plastic | Basic |
| Disassemblable | Yes | Difficult | Yes | No |
| Longevity | Generations | Good | Medium | Good |
| Skill Level | High | Low | Very Low | Medium |
| Cost Over Time | Very Low | Low | Low | Low |
| Aesthetic Value | Very High | Low | Medium | Medium |
| Repairability | Excellent | Medium | Poor | Medium |
Challenges I Faced During the Build
- Achieving perfectly tight but not too tight joints
- Cutting straight mortises by hand
- Keeping everything square during assembly
- Patience required for precise marking and cutting
- Learning when to stop refining a joint
Every challenge improved my skills and made the final furniture feel more special.
(FAQ)
1. Is Sashimono too difficult for beginners?
It has a learning curve, but starting with simple through mortise and tenon joints is very doable.
2. What is the best wood for Sashimono?
Walnut, cherry, oak, and maple work beautifully. Straight grain is important.
3. Do I need expensive Japanese tools?
No. Good quality Western tools also work well. Sharpness matters more than brand.
4. How strong are Sashimono joints really?
Extremely strong. Many traditional Japanese temples and furniture are hundreds of years old using only these joints.
5. Can Sashimono furniture be taken apart?
Yes, many designs are designed to be knockdown (disassemblable).
6. How long does it take to build one piece?
A simple side table takes 12–20 hours. Larger pieces take longer.
7. Is it suitable for small apartments?
Yes, that is one of the best uses. The clean look makes rooms feel bigger.
8. Should I use glue or not?
Traditional Sashimono often uses very little or no glue. For apartment use, a little glue on shoulders adds security.
9. Can I combine Sashimono with modern elements?
Absolutely. Many makers mix it with subtle metal accents or live edge slabs.
10. Where can I learn more advanced Sashimono?
Practice simple joints first, then move to Kumiko and more complex designs. Books and Japanese masters on YouTube are great resources.
Conclusion
Bringing Sashimono joinery into modern apartment furniture is more than just a woodworking technique — it is a philosophy of respect for wood, precision, and simplicity. Through careful marking, patient cutting, and thoughtful design, you can create furniture that is stronger, more beautiful, and more personal than anything you can buy.
In small modern apartments where space is precious and quality matters, Sashimono offers the perfect solution. The joints are invisible, the lines are clean, and the pieces feel calm and grounded. Every time you look at a table or shelf you built with these ancient techniques, you will feel a deep sense of pride and connection to the craft.
You don’t need a huge workshop or expensive tools to start. Begin with one small project — a side table, a shelf, or a simple stool. As your skills grow, you will be amazed at what you can create. Sashimono teaches patience, precision, and respect for materials — lessons that go far beyond woodworking.
If you live in an apartment and dream of better furniture, I highly encourage you to try Sashimono joinery. The process is meditative, the result is stunning, and the furniture you build will serve you beautifully for many years while making your small space feel like a real home.
This journey has completely changed how I furnish my apartment, and I believe it can do the same for you.
My Personal Opinion
Working with Sashimono joinery has been one of the most fulfilling parts of my woodworking journey. There is something deeply satisfying about cutting a perfect mortise and tenon that fits together like it was always meant to be one piece. In my small apartment, these clean, strong, nail-free pieces make the space feel calmer and more intentional. It proves that old techniques are often the best solutions for modern problems. If you give Sashimono a chance, I’m confident you will fall in love with it just like I did. The quiet joy of a perfectly fitted joint is something you have to experience to truly understand.
I’m Shubham, a professional carpenter with 11 years of experience in the craft. I specialize in turning high-quality wood into custom furniture, durable cabinetry, and precise structural work. For me, woodworking isn’t just a job—it’s about building things that last a lifetime


