Sometimes a simple tool sparks a deep passion for traditional woodworking, and before you realize it, that tool becomes one of the most satisfying and life-changing purchases you have ever made. This journey is exactly that kind of experience. The feel of sharp iron cutting through wood, the thin curling shavings, the quiet satisfaction of handwork, and the entire process behind setting up your first Kanna (Japanese hand plane) feels meditative, rewarding, and deeply connecting to the craft.
This is not just another tool setup guide. It is something far more special and far more meaningful. The goal here is to help you properly set up, tune, and start using your first Japanese Kanna so that it becomes a joy to use instead of a frustrating experience that sits in the corner.
That means this project must balance two completely different worlds. On one side, there is the beautiful tradition, philosophy, and craftsmanship of Japanese tools. On the other side, there is practical step-by-step learning, blade sharpening, body tuning, setup techniques, and real beginner-friendly advice that actually works.
Welcome to this complete journey of setting up your first Kanna for beginners.
A few months ago, I bought my first Kanna after watching many Japanese woodworking videos. When it arrived, I was excited but also confused. The instructions were in Japanese, the blade looked different from Western planes, and I had no idea how to set it up properly. After weeks of trial and error (and many YouTube videos), I finally got it working beautifully. Now it is one of my favorite tools. This guide is everything I wish I had when I started.
Before we pick up any tools or start sharpening, there was something very important that had to happen first.
Understanding What Makes a Kanna Special
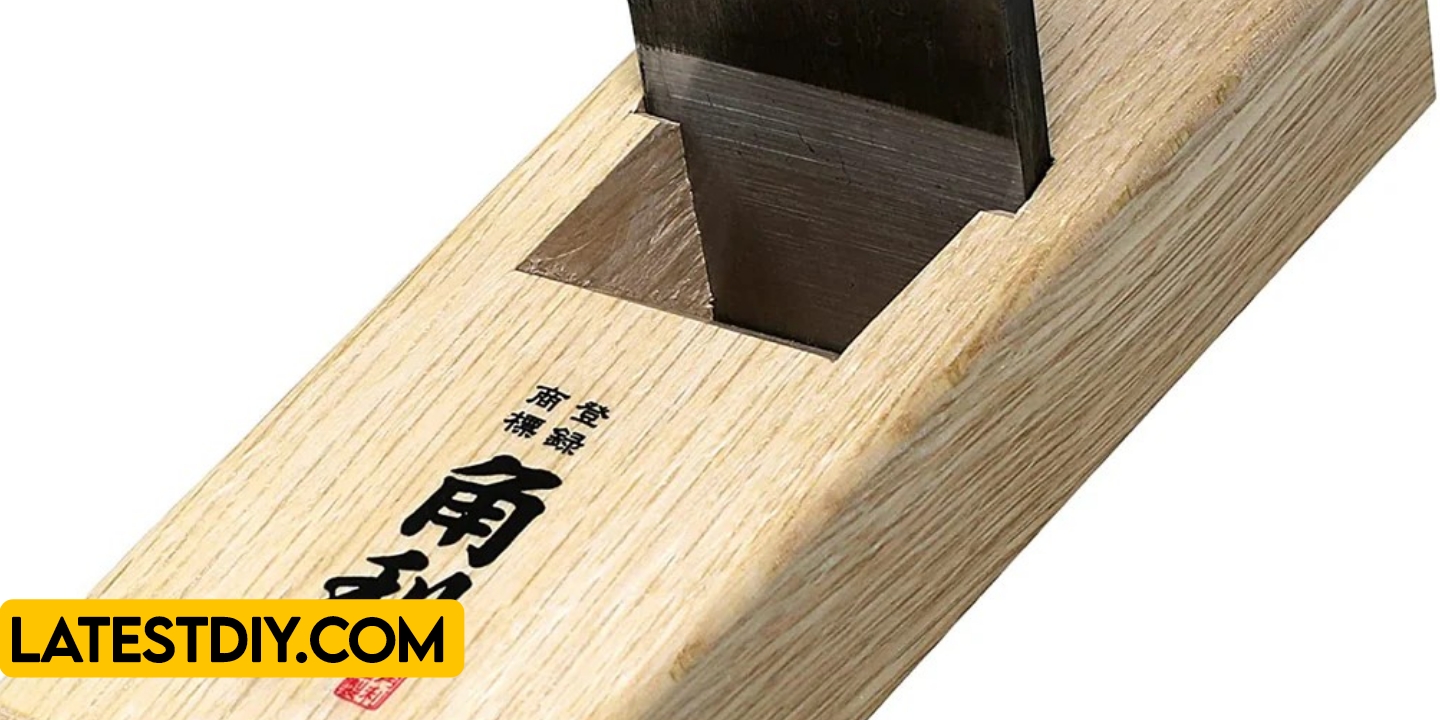
A Kanna is a traditional Japanese hand plane. Unlike Western planes that have a lot of adjustment screws and complex mechanisms, a Kanna is beautifully simple. It consists of a wooden body (dai), a sharp blade (iron), and a chip breaker (uragane).
The magic of Kanna lies in its ability to take whisper-thin shavings and leave an incredibly smooth surface that often needs no sanding. Japanese craftsmen have used these tools for centuries to create stunning work. Setting it up correctly is the key that unlocks this magic.
There are many types — smoothing planes (hira kanna), roughing planes, chamfer planes, etc. For beginners, I recommend starting with a standard 50mm to 70mm smoothing Kanna.
Why Learning to Set Up a Kanna is Worth It
Once tuned properly, a Kanna becomes addictive. The sound of the blade cutting, the smell of fresh shavings, and the glass-smooth finish it leaves will change how you feel about hand tools forever. It is also much quieter and more enjoyable than using power tools.
Tools and Materials You Will Need
Essential Items:
- Your new Kanna (blade + dai)
- Sharpening stones (1000 grit + 6000 or 8000 grit)
- Diamond stone or coarse stone for flattening
- Water spray bottle
- Small hammer (for blade adjustment)
- Straight edge and square
- Soft cloth and camellia oil
Optional but Helpful:
- Honing guide (for beginners)
- Marking gauge
- Small wooden mallet
Total extra cost after buying the Kanna: Around $60–120.
Step-by-Step Setup Process
Step 1: Initial Inspection and Cleaning
When your Kanna arrives, carefully unwrap it. Check for any damage during shipping. The blade will have a factory edge that needs proper sharpening. Clean the wooden body (dai) with a soft cloth. Lightly oil the wood with camellia oil to prevent cracking.
Step 2: Flattening the Blade Back (Ura)
This is the most important step for beginners. The back of the blade (ura) must be perfectly flat. I spent almost two hours on my first Kanna flattening the back on a 1000 grit stone. Use a marker to check progress. Keep the blade flat and move in figure-8 patterns. Once flat, move to higher grit stones until you get a mirror polish.
Step 3: Sharpening the Bevel
Japanese blades are usually sharpened at a very low angle (around 25–30 degrees). Set up your sharpening station and work through the grits. I like to create a small micro-bevel on the final 8000 grit stone for extra durability. The edge should be scary sharp — it should easily shave hair from your arm.
Step 4: Preparing the Chip Breaker (Uragane)
The chip breaker must fit perfectly against the blade with no gaps. File or stone the contact edge until it mates perfectly. This prevents tear-out and helps the plane cut smoothly.
Step 5: Tuning the Wooden Body (Dai)
The wooden dai needs careful tuning. Check if the bed where the blade sits is flat. Use a straight edge and small chisel or plane to remove high spots. The mouth opening should be very narrow (0.5mm or less for smoothing work). I carefully pared the mouth until it was perfect.
Step 6: Assembling and Initial Setup
Insert the blade and chip breaker into the dai. Tap the blade gently with a hammer from the top until it just starts to protrude. The blade should sit evenly across the mouth. Adjust by tapping left or right sides until the cutting edge is perfectly level.
Step 7: Final Tuning and Test Cuts
This is the exciting part. Take your first test cuts on a scrap piece of softwood like pine or cedar. Adjust the blade depth by tapping the top or the back of the dai. With a properly set Kanna, you should get thin, long, translucent shavings that curl beautifully. If it chatters or tears, make small adjustments.
Common Beginner Mistakes and How to Avoid Them
- Blade too tight in the dai → causes cracking
- Not flattening the back properly → poor cutting
- Mouth opening too wide → bad surface finish
- Uneven blade projection → wavy cuts
Benefits of Using a Properly Set Up Kanna
- Produces smoother surfaces than sandpaper
- Gives incredible control and feel
- Very quiet and peaceful to use
- Connects you to traditional craftsmanship
- Cheaper in the long run than power tools
- Portable and requires no electricity
- Highly satisfying and meditative
- Improves overall woodworking skills
- Creates paper-thin shavings (great for kindling too)
- Lasts for generations if cared for properly
Comparison Table: Kanna vs Western Hand Plane
| Feature | Japanese Kanna | Western Bench Plane | Block Plane |
|---|---|---|---|
| Adjustment Method | Hammer tapping | Screws & knobs | Simple lever |
| Cutting Angle | Very low (25-30°) | 45° | 20-25° |
| Finish Quality | Glass smooth | Very good | Good |
| Learning Curve | Steeper at start | Easier | Easy |
| Weight | Lightweight | Heavier | Very light |
| Maintenance | Blade sharpening | Blade + frog tuning | Simple |
| Feel & Satisfaction | Extremely high | High | Medium |
| Cost (Good Quality) | $80–250 | $150–400 | $50–150 |
Challenges I Faced as a Beginner
- Understanding the hammer adjustment technique
- Getting consistent sharp edges
- Tuning the dai without damaging it
- Making paper-thin shavings consistently
- Knowing when to stop sharpening
Every challenge made me better and the final results even sweeter.
(FAQ)
1. Which Kanna should a complete beginner buy?
Start with a 55mm or 65mm smoothing Kanna from a reputable maker like Fujihiro or Matsumura.
2. How long does it take to set up the first time?
Expect 4–8 hours for your very first Kanna. After that, maintenance takes 20–30 minutes.
3. Do I need expensive Japanese sharpening stones?
No. Good quality water stones from any brand work well. Start with 1000 and 6000 grit.
4. How often do I need to sharpen?
For regular use, every 30–60 minutes of planing. The edge is very sharp but thin.
5. Can I use a Kanna on hardwoods like walnut and oak?
Yes, once properly tuned it handles hardwoods beautifully.
6. What is the correct way to hold and use a Kanna?
Pull stroke (towards you) is traditional. Use your whole body, not just arms.
7. How do I store my Kanna?
Keep it in a dry place. Lightly oil the blade and put a small wooden block under the edge.
8. Is it normal for the dai to crack?
Small cracks can happen with humidity changes. Proper oiling prevents major issues.
9. How much should I spend on my first Kanna?
$100–200 is a good range for a quality beginner Kanna.
10. Will I ever get as good as Japanese craftsmen?
With regular practice, you can get very good. The joy is in the journey.
Conclusion
Setting up your first Kanna is more than just preparing a tool — it is the beginning of a beautiful relationship with traditional hand tools. Through careful sharpening, patient tuning, and lots of practice, you will discover the quiet joy that Japanese craftsmen have known for centuries.
The first time you take a perfect shaving that curls like ribbon and leaves a surface smoother than glass, you will understand why people fall in love with Kanna. It slows you down, makes you more mindful, and connects you to the wood in a way power tools never can.
Whether you are a complete beginner or someone who has only used Western planes, investing time in setting up your first Kanna properly will reward you for years to come. Be patient with yourself in the beginning. Every master was once a beginner who kept practicing.
This simple Japanese hand plane can change how you approach woodworking forever. It teaches patience, respect for tools, and the pure satisfaction of working with your hands.
If you have just bought your first Kanna, take your time with this guide. Set it up carefully, practice on scrap wood, and enjoy every moment. The journey of mastering a Kanna is one of the most rewarding paths in woodworking.
Opinion
This experience with my first Kanna completely changed my woodworking journey. There is something magical about pulling a perfectly tuned Kanna across a board and watching those thin shavings fly. It feels peaceful and powerful at the same time. In a world full of noisy power tools, the quiet whisper of a sharp Kanna brings me back to why I love making things with wood. If you are just starting, trust the process. Your first good shaving will make all the effort worth it. I still smile every time I pick up my Kanna.
I’m Shubham, a professional carpenter with 11 years of experience in the craft. I specialize in turning high-quality wood into custom furniture, durable cabinetry, and precise structural work. For me, woodworking isn’t just a job—it’s about building things that last a lifetime


