There is a very specific moment that happens when you first see a live edge coffee table in a showroom or even online where your brain immediately registers it as something premium, something natural, something that looks almost like a piece of art rather than just furniture, but at the exact same time when you look at the price tag attached to it you also realize that what you are actually paying for is not just wood but the entire process behind it including flattening, finishing, and shaping, and that is usually the point where most people either walk away or convince themselves that maybe it is not necessary, but the reality is that the only real barrier between you and building something like this yourself is understanding how to take an uneven, rough slab of wood and turn it into a flat, usable surface without access to industrial machines, which is exactly where the router sled method completely changes the game.
Understanding the Real Problem
The biggest misconception people have when they look at a live edge slab is that it is already close to being a table and just needs a bit of sanding and finishing, but the reality is that most slabs, especially budget-friendly ones, are far from flat and almost always contain some level of twist, warping, cupping, or uneven thickness that makes them completely unsuitable for direct use, and the reason this matters so much is because even a small imbalance in the surface can lead to serious issues later on such as wobbling, uneven weight distribution, or even long-term structural stress that can cause cracks or instability, which means that before you even think about legs, finishing, or aesthetics, the very first and most critical challenge you have to solve is flattening the slab in a way that is accurate, consistent, and repeatable.
The Thinking Behind the Router Sled
At first glance the idea of using a router to flatten an entire slab might sound inefficient or even impractical compared to using a large planer or industrial jointer, but when you take a step back and actually understand the logic behind it, you realize that what you are doing is not replacing a machine but recreating its function in a more accessible way by controlling the movement of the cutting tool instead of forcing the wood through a fixed system, and this shift in thinking is what makes the router sled so powerful because instead of needing expensive equipment you are essentially building a guided track system that allows you to move the router across the surface in a controlled manner, removing high spots gradually until the entire slab becomes level, which means that even though the process may take more time, it gives you precision and flexibility that is perfectly suited for a DIY environment.
Planning the Final Table Before Touching the Wood
One of the biggest mistakes that beginners make in projects like this is jumping straight into cutting or flattening without fully understanding what the final table is supposed to look like, and the reason this becomes a problem is because every pass you make with the router removes material permanently, which means that if you do not plan ahead you can very easily reduce the thickness of the slab more than necessary or end up with proportions that do not match your intended design, so before you even plug in a tool you need to decide the final length, width, thickness, and height of the table, along with how the base will be attached and what kind of aesthetic you are aiming for, because all of these decisions directly influence how aggressively you flatten the slab and how much material you can afford to remove.
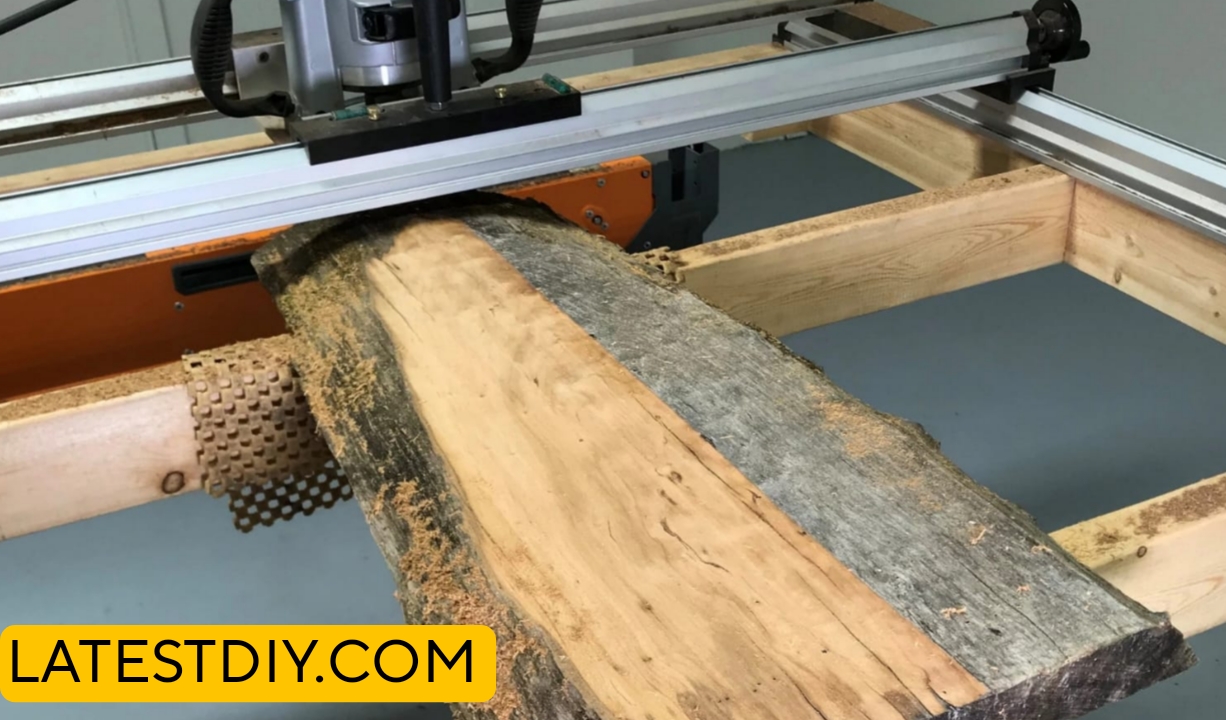
Visualizing the Router Sled System
When you break down the router sled setup into its simplest form, what you are really creating is a system where the router can move in two directions while maintaining a fixed height relative to the slab, which ensures that every pass removes material at the same level, and this is typically achieved by building two parallel rails on either side of the slab and placing a bridge or carriage on top that holds the router, allowing it to slide left and right while the entire carriage moves forward and backward, which creates a grid-like movement pattern that gradually covers the entire surface, and even though the setup looks simple, the accuracy of these rails and their alignment is what ultimately determines how flat your final surface will be.
Material Selection on a Budget
When you are working on a budget, the instinct is often to look for the cheapest slab available, but the smarter approach is to look for slabs that are slightly imperfect but still structurally sound, because things like surface roughness, minor cracks, or uneven edges can be corrected during the build process, whereas deep internal cracks or severe warping can compromise the entire project, which means that instead of focusing purely on price you should focus on value by choosing a slab that gives you enough usable material to work with after flattening, because the router sled process will already remove imperfections, effectively upgrading a lower-cost piece of wood into something that looks far more refined.
Tools and Why Each One Matters
Even though this is considered a budget build, every tool you use plays a specific role in the process, because the router is responsible for removing material in a controlled manner, the sled ensures consistent movement and leveling, clamps keep the slab from shifting during operation, and sanding tools refine the surface after flattening, which means that each tool contributes to a different stage of the build and skipping or replacing one without understanding its function can directly affect the quality of the final result, making it important to not just have the tools but to understand how they interact within the workflow.
Setting Up the Slab Properly Before Flattening
Before you even start the router for the first pass, one of the most important but often underestimated parts of the entire process is making sure that the slab is completely stable and properly supported, because if the slab shifts even slightly while you are routing across the surface then every pass you make will reference a moving surface instead of a fixed one, which means that instead of flattening the slab you will actually be creating a new uneven surface that follows those micro movements, and that is why the correct approach here is to carefully place the slab on a flat base and then use shims underneath it to eliminate any rocking or wobbling, ensuring that when you press down on any corner or edge there is absolutely no movement, because this setup effectively defines the “truth plane” from which your entire flattening process will be measured.
Building the Router Sled Structure
When constructing the router sled itself, what you are essentially doing is creating a guiding framework that controls the vertical position of your router while allowing smooth horizontal movement, and this means that the rails on either side of the slab must be perfectly parallel and level with each other, because even a small difference in height between the rails will translate directly into an uneven cut across the slab, which is why this step requires patience and careful measurement rather than speed, and once the rails are set correctly you then build a carriage that spans across them and holds the router securely, allowing it to slide left and right while maintaining a fixed cutting depth relative to the rails, which ultimately determines how flat your surface becomes after multiple passes.
The First Pass
When you begin the first pass with the router, it might feel like progress is extremely slow because you are only removing a very thin layer of material at a time, but this is actually intentional and necessary because taking deeper cuts too early can cause the router to struggle, create tear-out in the wood, or even shift the sled slightly, which would ruin the accuracy of the process, so instead of trying to rush through the flattening you focus on consistency by moving the router steadily across the slab, maintaining even pressure and speed, and allowing the bit to gradually shave down the highest points until you start seeing a consistent pattern of freshly cut wood across the surface.
Understanding the Flattening Process
As you continue making passes across the slab, something interesting starts to happen where certain areas begin to flatten out faster than others, and this visual feedback becomes extremely important because it tells you where the high spots were and how the surface is leveling out over time, and instead of blindly continuing the same motion you start to adjust your approach slightly by focusing more attention on areas that still show untouched surfaces, ensuring that every part of the slab eventually reaches the same level, which turns the process into a combination of controlled movement and observation rather than just repetitive motion.
Flipping the Slab
Once the top surface is completely flat, the job is only half done because the bottom side of the slab still retains its original uneven shape, which means that if you were to attach legs at this stage the table might still rock or sit unevenly, and that is why the next step is to flip the slab over and repeat the flattening process on the other side, but this time the already flattened surface becomes your reference point, ensuring that both faces of the slab end up parallel to each other, which is what ultimately gives the table its structural stability and professional feel.
Sanding the Surface
After routing is complete, the surface will still have visible tool marks and slight ridges from the overlapping passes, which means that sanding becomes the next critical step, and this is not just about making the surface smooth to the touch but about refining the entire appearance of the wood, because proper sanding removes imperfections, blends transitions between passes, and prepares the surface to absorb finish evenly, which ultimately determines how the grain and character of the wood will appear once the table is complete.
Preparing the Live Edge
One of the defining features of a live edge table is the natural shape of the wood along its edges, but while this organic look is visually appealing it also requires careful preparation to ensure that it is structurally sound and safe to use, which means removing loose bark, cleaning out weak areas, and smoothing sharp edges without completely losing the natural contour, because the goal is not to make the edge perfect but to make it stable and usable while preserving its original character.

Building the Table Base
When it comes to the base of the coffee table, the key is to create something that complements the slab without overpowering it, because the focus of the design is the live edge top itself, which means the base should provide stability and support while maintaining a clean and simple appearance, and depending on your preference this can be achieved using metal legs for a modern look or wooden supports for a more traditional feel, but in either case the attachment points must be carefully positioned to distribute weight evenly and prevent stress on any specific area of the slab.
Exact Dimensions Explained
While standard coffee table dimensions provide a good starting point, the final size of your table should always be influenced by how it will be used and where it will be placed, because a table that is too large can dominate a small space while one that is too small may not be practical, which is why understanding the relationship between length, width, and height becomes important, ensuring that the table fits comfortably within the room while remaining functional for everyday use.
Real Use Scenario
Once the table is complete and placed in a living room or workspace, the difference becomes immediately noticeable because instead of a generic piece of furniture you now have something that feels custom, natural, and unique, which not only serves a functional purpose but also adds character to the space, making it feel more intentional and thoughtfully designed.
Cut List
When you are working on a project like this, especially one that combines a natural slab with a custom-built base, the cut list is not just a checklist of pieces but a reflection of your entire planning process, because every measurement you finalize here directly affects how everything fits together later, which means that instead of randomly deciding sizes during the build you define them in advance based on the slab dimensions, the type of base you want, and how the weight will be distributed, ensuring that each component serves a purpose rather than just filling space.
Typical Cut List Example for Wooden Base
Top Support Rails – 2 pieces – 30 inches x 2.5 inches x 1.5 inches
Side Supports – 2 pieces – 16 inches x 2.5 inches x 1.5 inches
Lower Stretcher – 1 piece – 28 inches x 2.5 inches x 1.5 inches
Legs – 4 pieces – 16 inches height
And while these numbers may vary depending on your slab size, the important part is understanding that each cut contributes to stability, alignment, and overall strength, which is why accuracy at this stage prevents problems later during assembly.
Materials Explained
When selecting materials for both the tabletop and the base, the goal is not simply to choose what looks good but to choose what performs well over time, because the slab itself is already a heavy and natural piece of wood that will expand and contract slightly with environmental changes, which means the base must be strong enough to support that movement without restricting it, and this is why hardwood or properly dried construction lumber is preferred for the base, while high-quality screws and wood glue ensure that joints remain secure even under long-term use.
Cost Breakdown
One of the biggest advantages of this DIY approach is cost control, but to truly understand the value of the build you need to break down where the money is being spent, because not all parts of the project contribute equally to the final result.
Estimated Cost Breakdown
Live Edge Slab – $80 to $150 depending on quality and size
Router Bit (if not already owned) – $20 to $40
Plywood/MDF for Sled – $20 to $30
Base Materials – $30 to $70
Finishing Supplies (oil, polyurethane, etc.) – $20 to $40
Total Estimated Cost – $150 to $300
And when you compare this to store-bought live edge tables that often cost several times more, you begin to realize that most of what you are saving is not just material cost but labor and processing cost, which you are replacing with your own time and effort.
Before vs After Comparison
Before starting this project, the slab is essentially just a rough piece of wood that may look interesting but is not usable as furniture, and your workspace likely feels cluttered or incomplete without a centerpiece that ties everything together, but after completing the build you not only have a fully functional coffee table but also something that feels custom-made for your space, which changes not just the functionality but the overall atmosphere of the room.
Comparison Table
| Feature | Store Bought Table | DIY Router Sled Table |
|---|---|---|
| Cost | Very High | Controlled |
| Customization | Limited | Fully Custom |
| Material Choice | Fixed | Flexible |
| Learning Value | None | Extremely High |
| Satisfaction | Temporary | Long-Term |
And what this table really shows is that the biggest difference is not just in cost but in control and experience, because building something yourself gives you a deeper understanding of both the process and the final product.
Pro Tips
One of the most important things to remember during this entire process is that patience directly affects quality, because rushing through flattening or sanding will always leave marks that become visible later, which means that taking your time during each step actually saves time in the long run by reducing the need for corrections.
Another key insight is that always double-checking your sled alignment before starting can prevent hours of rework, because even a slight misalignment can create an uneven surface that requires additional passes to fix.
Common Mistakes
A very common mistake during this build is not properly securing the slab before routing, which happens because people underestimate how small movements can affect the final result, but even minor shifts can create inconsistencies that are difficult to correct later.
Another frequent issue is taking too deep of a cut with the router, which usually comes from trying to speed up the process, but this often leads to tear-out, rough surfaces, and increased strain on the tool, ultimately reducing both efficiency and quality.
Customization Ideas
Once you understand the basic process of building a live edge coffee table, you can start experimenting with different design elements that make the table more unique and suited to your personal style, such as adding epoxy fills to highlight cracks and voids, integrating metal or hairpin legs for a modern look, or even incorporating storage features underneath the slab, which transforms the table from a simple surface into a multifunctional piece of furniture.
Real Use Scenarios
This type of table works especially well in environments where natural materials can stand out, such as living rooms with minimal decor, studio apartments where every piece needs to have both function and visual impact, or even creative workspaces where the table becomes part of the overall aesthetic, which means that beyond its practical use it also contributes to how the space feels and is experienced.
Final Conclusion
When you look back at the entire process from selecting a rough slab to flattening it with a router sled and finally turning it into a finished coffee table, what stands out the most is not just the end result but the understanding you gain along the way, because instead of relying on expensive machines or pre-made solutions you learn how to solve problems step by step using logic, patience, and simple tools, which proves that high-quality results are not limited to professional workshops but can be achieved in a DIY environment with the right approach.
I’m Shubham, a professional carpenter with 11 years of experience in the craft. I specialize in turning high-quality wood into custom furniture, durable cabinetry, and precise structural work. For me, woodworking isn’t just a job—it’s about building things that last a lifetime


