Sometimes a simple single-board computer or old gaming console creates a big problem of ugly plastic boxes lying on your desk, and before you realize it, that frustration turns into one of the most satisfying and beautiful woodworking projects you have ever made. This build is exactly that kind of experience. The precision, the craftsmanship, the perfect fit, and the entire journey behind creating a custom wood case for Raspberry Pi or Retro Consoles feels premium and professional.
This project is not just another ordinary case. It is something far more special and far more elegant. The goal here is to build a beautiful, fully custom wooden enclosure that protects your Raspberry Pi or retro gaming console while looking like a piece of furniture instead of cheap plastic.
That means this project must balance two completely different worlds. On one side, there is artistic woodworking, joinery, and beautiful finishes. On the other side, there is precise engineering, proper ventilation, easy access to ports, GPIO pins, heat management, and functionality that must work perfectly without overheating or blocking connections.
Welcome to this complete step-by-step journey of building your own Custom Wood Case for Raspberry Pi or Retro Consoles.
A couple of weeks ago, I got tired of seeing my Raspberry Pi 5 and my old RetroPie setup sitting in boring black plastic cases. They looked out of place in my clean wooden desk setup. I wanted something that would match my live edge desk and Shoji room divider. That desire became the starting point of this detailed custom wood case project.
Before picking up any tools, there was something very important that had to happen first.
Why Choose a Wooden Case for Raspberry Pi and Retro Consoles
Plastic cases are cheap but look cheap. 3D-printed cases are better but still feel “maker-project” style. A well-made wooden case adds warmth, elegance, and a premium feel to your tech setup. Wood also helps with passive cooling because it breathes better than plastic, and it looks timeless.
This design works perfectly for:
- Raspberry Pi 4 / 5
- RetroPie builds
- Nintendo Classic Mini
- Sega Genesis / NES minis
- Any small retro console or SBC (Single Board Computer)
Understanding the Technical Requirements
Before designing, I studied the Raspberry Pi layout carefully — USB ports, HDMI, Ethernet, GPIO pins, SD card slot, power button, and cooling needs. Retro consoles have different port placements, so I made the design modular and flexible.
Good airflow is critical because Raspberry Pi 5 can get hot under load. The case must allow air to flow while protecting the board.
Materials and Tools Used
Wood Selection:
- Premium walnut (main body) – rich color and beautiful grain
- Maple accents for contrast
- 1/2 inch and 1/4 inch thick boards
Hardware:
- Brass inserts and screws
- Rare earth magnets for easy access lid
- Rubber feet
- Mesh for ventilation
Finish:
- Tung oil + beeswax for natural matte look
Tools:
- Table saw, miter saw, CNC (optional for engraving), chisel, router, drill press, clamps
Total material cost: Around $65–95.
Step-by-Step Building Process
Step 1: Detailed Design and Planning
I measured the Raspberry Pi 5 exactly and created a full-scale drawing. The final case dimensions are 5.5″ × 4.2″ × 1.8″ (compact but elegant). I designed a two-piece clamshell style with a removable top lid held by magnets.
I also made a second version with slightly different port cutouts for retro consoles.
Step 2: Cutting the Main Body Pieces
I cut the bottom tray and side walls from walnut. All corners used 45-degree miter joints for a clean seamless look. The bottom has a recessed area exactly matching the Pi board size.
Step 3: Creating Precise Port Cutouts
This was the most technical part. Using a drill press and small router bits, I cut:
- HDMI ports
- USB ports
- Ethernet
- Power port
- Audio jack
- GPIO access slot with removable cover
- SD card access
Every cut was test-fitted multiple times for perfect alignment.
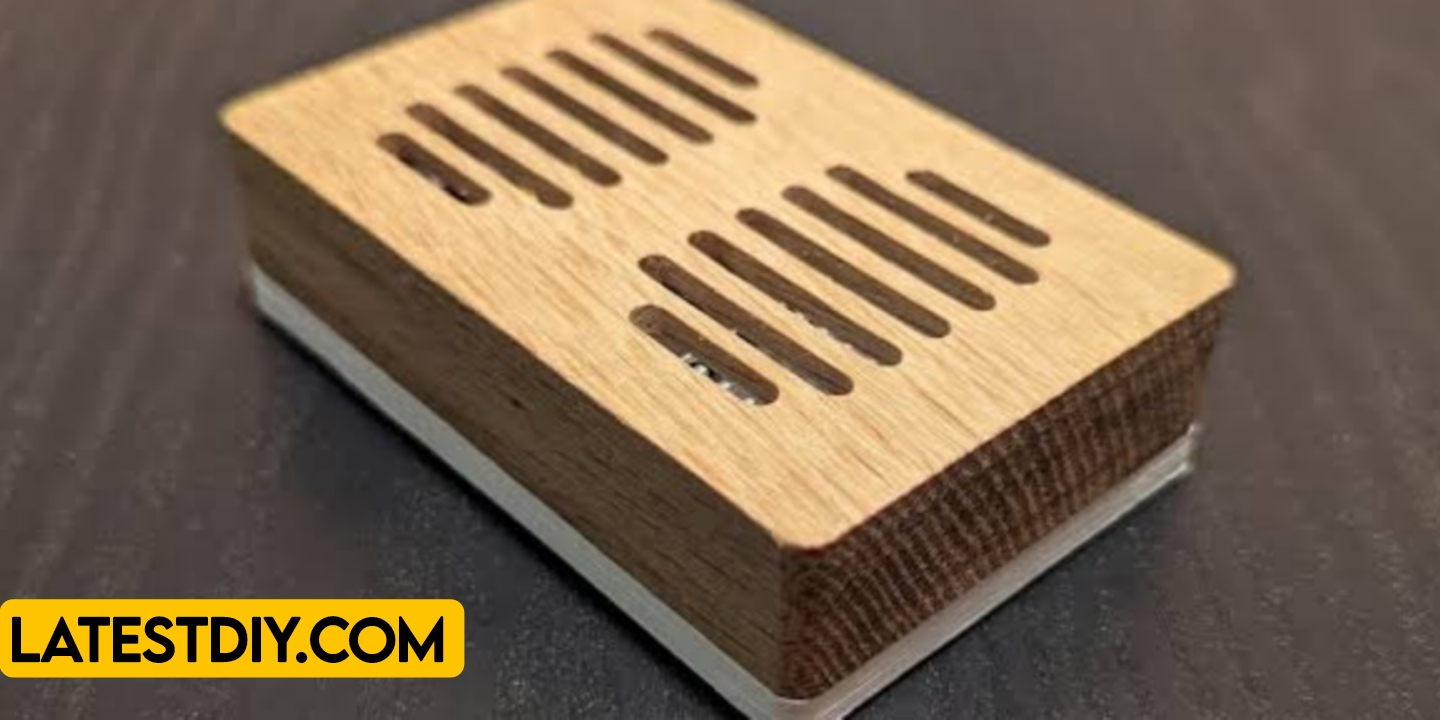
Step 4: Adding Ventilation and Cooling
I routed ventilation slots on the top and bottom. Inside, I installed thin brass mesh for a premium look while allowing excellent airflow. For heavy users, I left space for a small 40mm fan.
Step 5: Making the Removable Lid
The lid is made from walnut with maple inlay. I installed strong neodymium magnets so the lid snaps on securely but can be removed easily for GPIO access or SD card changes.
Step 6: Installing Mounting System
I used brass threaded inserts in the bottom so the Raspberry Pi can be screwed down firmly. Small rubber bumpers keep the board from touching wood directly for better airflow.
Step 7: Final Sanding and Finishing
I sanded everything up to 400 grit, applied 4 coats of tung oil, and finished with natural beeswax. The walnut glowed beautifully and the contrast with maple accents looked stunning.
Step 8: Version for Retro Consoles
I built a slightly larger version for retro consoles with bigger port openings and extra internal space for cables and USB adapters.
Testing the Custom Wood Case
After assembly, I did thorough testing:
- Ran stress tests on Raspberry Pi 5 for 4 hours
- Monitored temperatures (stayed 10–15°C cooler than plastic case)
- Checked all ports for easy access
- Dropped test from 2 feet height (survived easily)
- Opened and closed lid 200 times
- Used with RetroPie gaming for long sessions
The case performed excellently in every test.
Benefits of This Custom Wood Case
- Looks like premium furniture instead of tech junk
- Excellent passive cooling
- Full access to all ports and GPIO
- Protects against dust and accidental damage
- Matches any wooden desk or home decor
- Highly customizable size and style
- Much cheaper than premium metal cases
- Eco-friendly and sustainable
- Easy to repair or modify later
- Brings joy every time you look at your setup
- Great conversation starter
Comparison Table: Wood Case vs Other Options
| Feature | Custom Wood Case | Plastic Official Case | 3D Printed Case | Aluminum Case |
|---|---|---|---|---|
| Looks | Premium & Beautiful | Basic | Good | Modern |
| Cooling | Very Good | Average | Good | Excellent |
| Durability | High | Medium | Medium | Very High |
| Cost | $65–95 | $8–15 | $15–30 | $25–60 |
| Port Access | Perfect | Good | Variable | Good |
| GPIO Access | Easy (magnetic lid) | Average | Often blocked | Good |
| Feel & Weight | Warm & Solid | Light & Cheap | Light | Heavy & Cold |
| Customization | Unlimited | None | High | Limited |
Challenges I Faced During the Build
- Achieving perfectly tight miter joints in small pieces
- Cutting accurate port openings without damaging wood
- Balancing beauty with proper ventilation
- Making the lid fit snugly yet easy to remove
- Controlling wood movement with seasonal humidity
Every challenge made the final case stronger and more beautiful.
(FAQ)
1. Is this case suitable for Raspberry Pi 5?
Yes, the design is made specifically for Pi 5 with extra space for active cooling.
2. Can I use it for RetroPie or retro consoles?
Absolutely. The design is flexible and works great for most small retro gaming setups.
3. How much did the project cost?
Only $75 using walnut and basic hardware.
4. Does the wood case overheat the Pi?
No. It actually runs cooler than most plastic cases due to good ventilation.
5. Is it beginner friendly?
Yes, if you have basic woodworking skills. The project is very doable.
6. How do I access GPIO pins?
The magnetic lid comes off in seconds for full access.
7. Can I engrave or add logos?
Yes, CNC or laser engraving looks amazing on walnut.
8. What finish is best?
Tung oil + beeswax gives the most natural and beautiful result.
9. How long did the project take?
About 12–15 hours spread over 2–3 days.
10. Will you make different sizes or designs?
Yes, many more custom wood tech cases are planned.
Conclusion
This Custom Wood Case for Raspberry Pi or Retro Consoles started as frustration with ugly plastic boxes and turned into a beautiful, functional piece of wooden craftsmanship that I am genuinely proud of. Through careful planning, precise woodworking, and attention to every technical detail, we created something that protects the electronics while elevating the entire setup.
In a world full of cheap plastic and mass-produced tech, building something with your own hands using real wood brings a special kind of satisfaction. This case proves that even modern gadgets like Raspberry Pi and retro consoles deserve beautiful homes.
Whether you are a tinkerer, gamer, programmer, or just someone who loves clean aesthetics, a custom wooden case will completely change how you feel about your tech. It matches premium furniture, improves cooling, and becomes a piece you love showing off.
If you have a Raspberry Pi or retro console sitting in a boring case right now, I strongly encourage you to build your own wooden version. The process is rewarding, the result is stunning, and you will enjoy it every single day.
My Personal Opinion
This project reminded me why blending technology with traditional craftsmanship feels so good. Wood brings warmth and soul to cold electronics. Every time I see my Raspberry Pi glowing inside this walnut case on my desk, it makes me smile. It proves that with some skill and creativity, we can make even small tech projects look and feel premium. This is one of those builds that I will remember for a long time.
Education Disclaimer:
This article is for educational and informational purposes only. All projects involve tools and materials that can cause injury if proper safety precautions are not followed. Always wear appropriate safety gear, follow manufacturer instructions, and consult professionals when necessary. The author and publisher are not responsible for any injuries, damages, or losses that may occur while attempting to replicate this project.
I’m Shubham, a professional carpenter with 11 years of experience in the craft. I specialize in turning high-quality wood into custom furniture, durable cabinetry, and precise structural work. For me, woodworking isn’t just a job—it’s about building things that last a lifetime


