Sometimes a simple piece of wood and a mysterious old technique can completely change how you finish furniture forever. This journey is exactly that kind of experience. The silky smooth touch, the deep glass-like shine, the warm glow that brings out every figure in the wood, and the entire meditative process behind French Polishing with Shellac feels like pure magic.
This is not just another finishing method. It is something far more special and far more elegant. The goal here is to reveal the real secrets of traditional French Polishing using shellac — the technique that master craftsmen have used for centuries to create mirror-like finishes on fine furniture, musical instruments, and priceless antiques.
That means this guide must balance two completely different worlds. On one side, there is the romantic, old-world craftsmanship and patience of French Polishing. On the other side, there is practical, modern advice that even beginners can follow successfully.
Welcome to this complete journey into The Secret of French Polishing with Shellac.
A few months ago, I was tired of using polyurethane that looked plastic and felt cold. I wanted a finish that felt alive, warm, and luxurious. After watching old videos and making many mistakes, I finally discovered the true secrets of French Polishing. Now my walnut projects look like they came from a high-end gallery. The finish is so beautiful that people touch it and ask, “How did you get this shine?” This guide shares everything — the real secrets, the mistakes, and the techniques that actually work.
Before we start rubbing shellac, there was something very important that had to happen first.
What Exactly is French Polishing?
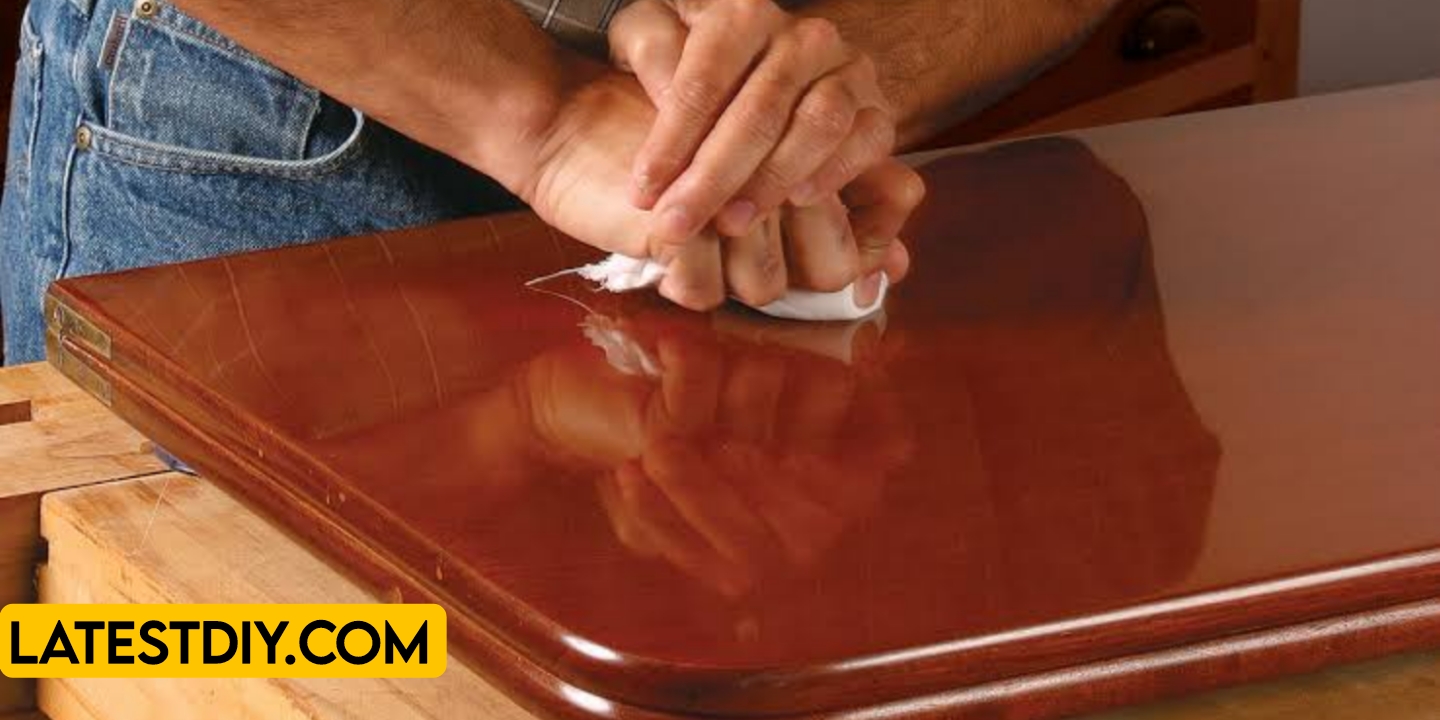
French Polishing is a traditional hand-rubbing technique that applies multiple ultra-thin layers of shellac using a special cloth pad (called a “rubber”). Unlike spraying or brushing, you build the finish slowly by hand, creating an incredibly thin, smooth, and deep shine that enhances the natural beauty of the wood.
Shellac is the key material. It is a natural resin secreted by the lac bug in India. When dissolved in alcohol, it creates a finish that is:
- Crystal clear
- Warm to the touch
- Repairable
- Food-safe (in many forms)
- Beautifully glossy or satin
The “secret” is not in fancy tools — it is in patience, technique, and understanding how shellac behaves.
Why French Polishing is Still Considered the King of Finishes
French Polishing gives a depth and clarity that no modern finish can fully match. It brings out the chatoyancy (the 3D shimmer) in figured woods like walnut, maple, and rosewood. It feels alive under your hand and ages gracefully.
Materials and Tools You Will Need
Shellac:
- Dewaxed shellac flakes (blonde, amber, or garnet)
- Denatured alcohol (or pure ethanol)
Core Tools:
- French Polish rubber (cloth pad)
- Cotton wool or cheesecloth
- Mineral oil (for lubrication)
- Pumice powder and rottenstone (for optional leveling)
- Clean lint-free rags
Optional:
- Shellac thinner
- Small glass jars
- Sanding sealer
Total cost for your first project: $45–90.
Step 1: Surface Preparation (The Most Important Secret)
French Polishing shows every imperfection. Sand to at least 400 grit, preferably 600 grit. Raise the grain with water, let dry, and sand again. This secret step prevents ugly raised fibers later.
Step 2: Making Your French Polish Rubber
This is a critical secret. Wrap cotton wool in a lint-free cloth to form a fist-sized pad. The bottom should be smooth and tight. This rubber is your main tool.
Step 3: Mixing Shellac
Start with a 1-pound cut (1 lb flakes in 1 gallon alcohol). For beginners, use a 2-pound cut. Let it dissolve completely — this takes 24 hours with occasional shaking.
Step 4: The Core Technique – Building Layers
This is where the magic happens. The real secret is applying extremely thin coats and letting them dry fully between sessions.
The Eight Motion Method (The Professional Secret):
- Apply shellac in straight strokes
- Circle motion
- Figure-8 motion
- Light pressure with mineral oil as lubricant
Work in small sections. Add a drop of oil only when the rubber starts to drag. Never flood the surface.
Step 5: Building the Finish (Multiple Sessions)
French Polishing is done over several days:
- Day 1–2: Base coats (sealing the wood)
- Day 3–5: Bodying up (building thickness)
- Final days: Spiriting off (removing oil and achieving mirror shine)
Step 6: Achieving the Glass-Like Shine
The ultimate secret is patience during the final spiriting stage. Use a fresh rubber with pure alcohol to gently remove the oil and melt the surface into a perfect shine.
Step 7: Final Maintenance
French Polish is repairable. Small scratches can be fixed by rubbing more shellac. This is one of its greatest advantages.
The Real Secrets Most People Never Tell You
- Shellac loves humidity — work in 40-60% relative humidity
- Less is more — thin coats beat thick coats every time
- Oil is your friend and enemy — use it sparingly
- The rubber pressure and speed control everything
- Temperature matters more than you think
- Practice on scrap wood first (very important secret)
Benefits of French Polishing with Shellac
- Unmatched depth and clarity
- Warm, natural feel (unlike plastic finishes)
- Enhances wood figure dramatically
- Easy to repair and maintain
- Beautiful on both light and dark woods
- Traditional and luxurious appearance
- Relatively inexpensive
- Eco-friendly natural resin
- Creates a sense of pride and craftsmanship
- Timeless finish that never goes out of style
Comparison Table: French Polishing vs Modern Finishes
| Feature | French Polishing (Shellac) | Polyurethane | Lacquer | Oil Finish |
|---|---|---|---|---|
| Appearance | Deepest, warmest glow | Plastic shine | Bright shine | Natural matte |
| Touch Feel | Silky & Warm | Cold & Plastic | Smooth | Oily |
| Repairability | Excellent | Difficult | Good | Easy |
| Durability | Good (with care) | Very High | High | Medium |
| Application Time | 5–10 days | 1–2 days | 1 day | 1–2 days |
| Skill Level | High | Low | Medium | Low |
| Cost | Low | Medium | Medium | Very Low |
| Reversibility | Fully reversible | Difficult | Good | Easy |
Challenges and How to Overcome Them
- Pad sticking → Use more oil or let it dry longer
- Cloudy finish → Too much oil or high humidity
- Uneven shine → Inconsistent pressure
- Taking too long → Accept that it is a slow, meditative process
(FAQ)
1. Is French Polishing difficult for beginners?
It has a learning curve, but with practice on scrap wood, most people get good results in 2–3 attempts.
2. How long does a full French Polish take?
Usually 5–10 days with drying time between sessions.
3. Is shellac durable for tabletops?
It is good for light use. For heavy tabletops, add a final coat of wax or use it on vertical surfaces.
4. What is the best shellac color?
Blonde for light woods, amber/garnet for warmer tones.
5. Can I use store-bought shellac?
Yes, but mixing fresh flakes gives better results.
6. How do I fix a mistake?
Simply sand lightly and apply more shellac — it is very forgiving.
7. Is French Polishing food safe?
Pure shellac is food-safe once fully cured.
8. How do I maintain the finish?
Dust regularly and refresh with a light rub of shellac every few years.
9. What woods look best with French Polish?
Walnut, mahogany, cherry, maple, and rosewood shine beautifully.
10. Is it worth learning in 2026?
Absolutely. It is one of the most satisfying and beautiful finishes you can master.
Conclusion
The secret of French Polishing with shellac is not in expensive tools or secret recipes — it is in patience, thin layers, proper technique, and respect for the material. When you finally achieve that deep, mirror-like shine that makes the wood look alive, you understand why this technique has survived for over 300 years.
French Polishing connects you to the old masters. It slows you down in a fast world and rewards mindfulness. The finish you create has a soul that modern sprayed finishes simply cannot match.
Whether you are restoring an antique, finishing a handmade table, or polishing a guitar, mastering French Polishing will elevate your woodworking to a new level. Start small, practice the rubber technique, and be patient with yourself. The first time you see your wood glowing with that unmistakable French Polish shine, all the effort will feel completely worth it.
This ancient technique still feels fresh and luxurious today. It proves that sometimes the oldest methods create the most beautiful results.
If you have been searching for a finish that feels special, warm, and truly elegant — French Polishing with shellac might be exactly what you need. The secret is now in your hands. Go create something beautiful.
Opinion
French Polishing completely changed how I finish wood. There is something almost spiritual about spending hours rubbing shellac and watching the surface transform into liquid glass. In a world of quick spray finishes, this slow, hand-done technique brings me peace and pride. Every time I run my hand over a French Polished surface, I smile. It feels alive. If you are serious about woodworking, take the time to learn French Polishing. It is one of those skills that separates good work from truly exceptional work. I genuinely believe it is a secret worth mastering
I’m Shubham, a professional carpenter with 11 years of experience in the craft. I specialize in turning high-quality wood into custom furniture, durable cabinetry, and precise structural work. For me, woodworking isn’t just a job—it’s about building things that last a lifetime


