Sometimes a simple wooden grid pattern catches your eye and before you realize it, you fall in love with one of the most beautiful and satisfying techniques in woodworking. This journey is exactly that kind of experience. The precision, the repeating geometry, the satisfying “click” when pieces fit together, and the entire process behind learning the Asanoha Kumiko pattern feels meditative, rewarding, and almost magical for beginners.
This guide is not about all Kumiko patterns. It focuses only on the Asanoha pattern — one of the most popular, elegant, and beginner-friendly designs in traditional Japanese Kumiko woodworking. By the end of this article, you will understand exactly how to design, cut, and assemble beautiful Asanoha panels for lamps, room dividers, cabinet doors, or decorative screens.
That means this guide must balance two completely different worlds. On one side, there is the ancient Japanese art of Kumiko and its peaceful philosophy. On the other side, there is practical, beginner-friendly instruction with simple tools, clear steps, and real-world tips that actually work.
Welcome to this complete beginner’s journey into the wonderful world of Asanoha Kumiko patterns.
A few months ago, I saw my first Asanoha Kumiko panel in a small Japanese-inspired lamp. The way light danced through the geometric hemp-leaf pattern was breathtaking. I wanted to make it myself but felt overwhelmed. After many failed attempts and lots of practice, I finally succeeded. Now Asanoha has become one of my favorite patterns. This guide is everything I wish I had when I started.
Before we pick up any tools, there was something very important that had to happen first.
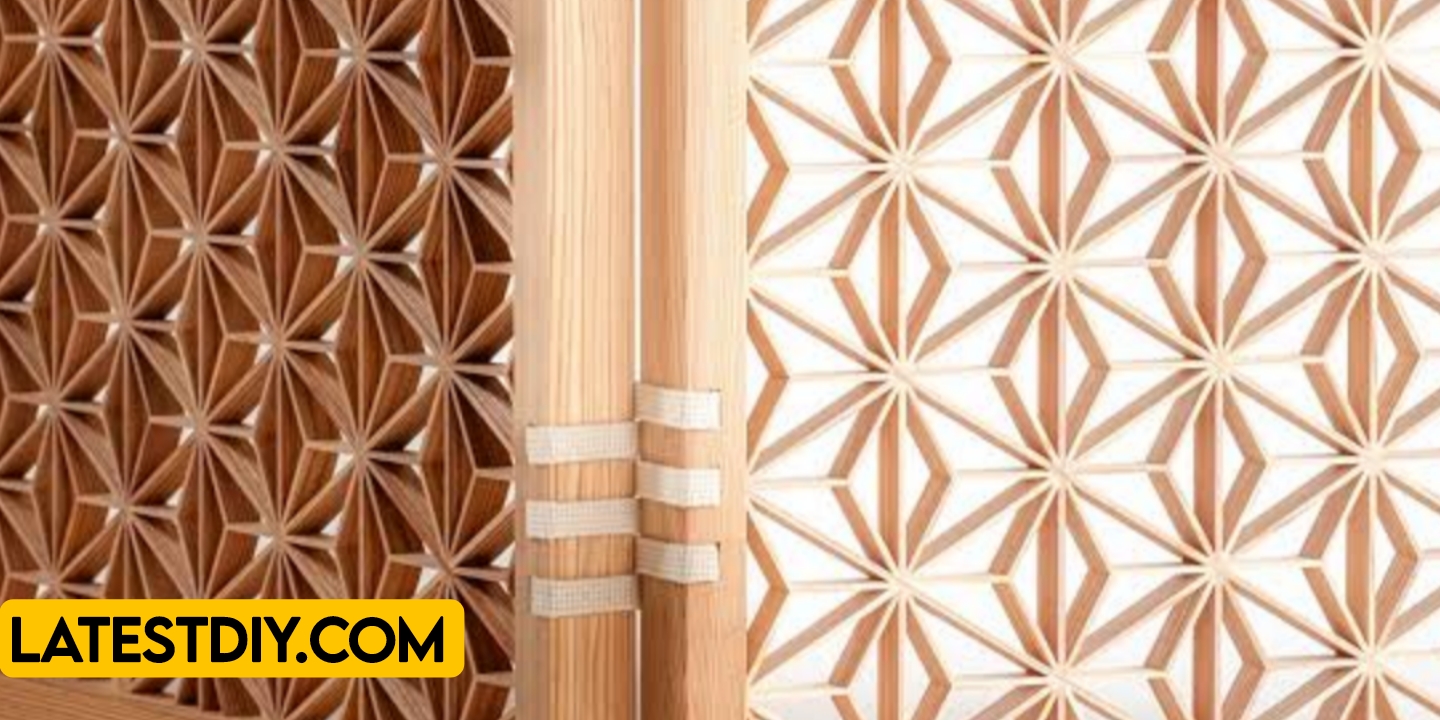
What is Kumiko and Why is Asanoha Special?
Kumiko is a traditional Japanese woodworking technique where thin strips of wood are precisely cut and joined together into intricate patterns without nails or glue (in many cases). The pieces lock together through perfect friction fits.
Asanoha (麻の葉) means “Hemp Leaf.” It is one of the most beloved Kumiko patterns because:
- It looks like beautiful repeating stars or leaves
- It creates stunning light effects
- It is relatively simple for beginners once you understand the geometry
- It looks equally beautiful in both light and dark woods
The basic Asanoha unit is a hexagon with internal triangles that form a star-like shape. When repeated, it creates a mesmerizing flowing pattern.
Why Beginners Should Start with Asanoha
Asanoha is perfect for first-time Kumiko makers because:
- The angles are mostly 30° and 60° (easy to cut)
- The pattern is forgiving compared to more complex designs
- It looks impressive even with small panels
- It teaches all the basic Kumiko skills you need
Tools and Materials You Will Need
Wood:
- Straight-grained softwood or hardwood (basswood, pine, cherry, walnut)
- 1/8″ to 3/16″ thick strips (4–5mm)
Essential Tools:
- Japanese pull saw or fine backsaw
- Kumiko jig (simple table saw sled or miter gauge)
- Sharp chisel
- Sanding block
- Small hammer or mallet
- Clamping board
Optional but Helpful:
- Digital angle gauge
- Shooting board
- Thin veneer for accents
Total cost for your first small Asanoha panel: $25–60.
Step-by-Step Guide to Making Your First Asanoha Kumiko Panel
Step 1: Understanding the Geometry
The Asanoha pattern is built on a hexagonal grid. Each “leaf” is made of 6 triangles around a center point. I spent time drawing the pattern on paper first until I could visualize how every piece fits.
Step 2: Preparing Perfect Strips
All strips must be exactly the same width and thickness. I ripped 1/8″ thick strips on the table saw and then planed them smooth. Consistency is the secret to good Kumiko.
Step 3: Cutting the Basic Pieces
You need three main types of pieces for Asanoha:
- Long diagonal pieces (60° angles)
- Short connector pieces
- Center star pieces
I made a simple 30°/60° cutting jig on the table saw. Every cut must be extremely accurate — even 0.5° error will show in the final pattern.
Step 4: Assembling the First Asanoha Unit
This is the magical moment. Start with the center hexagon. Insert the six triangular pieces that form the first “leaf.” Then add the surrounding pieces that connect to the next unit. The pieces should fit with firm hand pressure — snug but not forced.
Step 5: Building the Full Panel
I usually make a 6×6 or 8×8 grid of Asanoha units for a small decorative panel. Work row by row, constantly checking for squareness. The pattern grows quickly once the first few units are perfect.
Step 6: Sanding and Finishing
After assembly, sand the entire panel flat. I finish with natural tung oil or leave it raw for a bright look. The pattern really comes alive when light passes through it.
Step 7: Installing in a Frame
I built a simple walnut frame with a rabbet to hold the Kumiko panel. The contrast between dark frame and light Asanoha pattern looks stunning.
Common Beginner Mistakes and How to Fix Them
- Inaccurate angles → pieces don’t fit
- Uneven strip thickness → gaps appear
- Rushing the cuts → frustration
- Forcing tight joints → broken pieces
Benefits of Learning Asanoha Kumiko
- Creates incredibly beautiful light effects
- Develops patience and precision skills
- Very meditative and relaxing process
- Makes unique gifts and home decor
- Low material cost
- Endless design variations possible
- Boosts confidence in woodworking
- Looks professional even for beginners
- Connects you to Japanese craft tradition
- Highly satisfying when the pattern completes
Comparison Table: Asanoha vs Other Kumiko Patterns
| Feature | Asanoha Pattern | Asa-no-ha (Basic) | Tortoise Shell | Flower Pattern |
|---|---|---|---|---|
| Difficulty for Beginners | Easy-Medium | Easy | Medium-Hard | Hard |
| Visual Impact | Very High | High | Excellent | Outstanding |
| Light Effect | Beautiful | Good | Dramatic | Very Dramatic |
| Cutting Accuracy Needed | Medium | Low | High | Very High |
| Time to Complete | 6–12 hours | 4–8 hours | 15+ hours | 20+ hours |
| Best For | Lamps, Screens | Practice | Cabinet Doors | Art Pieces |
Challenges I Faced as a Beginner
- Getting all angles exactly 30° and 60°
- Keeping consistent pressure while assembling
- Sanding without breaking delicate pieces
- Making larger panels without warping
- Learning when a piece was “good enough”
Every challenge taught me something valuable and made the final panels look better.
(FAQ)
1. How long does it take to make my first Asanoha panel?
A small 6×6 unit panel takes 6–10 hours once you have the jig ready.
2. Do I need expensive Japanese tools?
No. A good table saw, miter gauge, and sharp handsaw are enough to start.
3. What is the best wood for beginners?
Basswood or pine is forgiving. Later you can try walnut or cherry.
4. Can I make Asanoha without a table saw?
Yes, but it will take longer. A good Japanese pull saw and jig can work.
5. How small can the pieces be?
Start with 3/8″ to 1/2″ wide strips. Smaller is harder for beginners.
6. Should I use glue?
Many traditional makers use no glue. For beginners, a tiny drop at each joint helps.
7. What can I make with Asanoha Kumiko?
Lampshades, room dividers, cabinet inserts, wall art, speaker covers, and gift boxes.
8. How do I get perfect tight joints?
Sharp tools, accurate jigs, and patience. Test fit every piece before final assembly.
9. Is Asanoha hard to learn?
It is one of the easier complex-looking patterns. Most beginners succeed within a few tries.
10. Can I sell Asanoha Kumiko pieces?
Yes! Handmade Kumiko panels sell very well, especially in lamps and room dividers.
Conclusion
Learning the Asanoha Kumiko pattern is more than just cutting wood — it is entering a beautiful world of geometry, patience, and light. Through careful preparation, accurate cutting, and mindful assembly, you can create pieces that look like delicate art but are made from simple wooden strips.
The first time you hold up your completed Asanoha panel and watch light dance through the repeating hemp-leaf pattern, you will feel pure joy. It is one of those woodworking experiences that keeps you coming back for more.
Whether you want to make a small decorative panel, a lamp, or a full room divider, Asanoha is the perfect starting point in the Kumiko journey. It teaches all the fundamental skills while giving you stunning results that impress everyone who sees them.
Start small, be patient with yourself, and enjoy the process. The quiet satisfaction of fitting the last piece into a perfect Asanoha grid is something every woodworker should experience.
This ancient Japanese pattern still feels fresh and modern today. It proves that sometimes the most beautiful things come from simple repeating shapes and careful hands.
If you have never tried Kumiko before, make Asanoha your first pattern. You will not regret it. The journey from confusion to confidence is incredibly rewarding, and the finished pieces will bring beauty and calm into your home for years to come.
My Personal Opinion
Asanoha Kumiko completely captured my heart. There is something almost therapeutic about sitting and carefully fitting each tiny piece until the pattern emerges. In our noisy, fast world, the slow, precise work of Kumiko feels like a reset button. Every time I turn on a lamp with my Asanoha panel inside, I smile. It reminds me that beauty can come from patience and simple geometry. If you are thinking about trying Kumiko, start with Asanoha. It might just become one of your favorite techniques too.
I’m Shubham, a professional carpenter with 11 years of experience in the craft. I specialize in turning high-quality wood into custom furniture, durable cabinetry, and precise structural work. For me, woodworking isn’t just a job—it’s about building things that last a lifetime


