Sometimes a simple need for a sturdy gate turns into one of the most satisfying and beautiful woodworking projects you have ever built. This build is exactly that kind of experience. The strength, the rustic charm, the clever engineering, and the entire process behind creating a Z-Frame Farmhouse Gate feels both traditional and deeply rewarding.
This project is not just another gate. It is something far more special and far more practical. The goal here is to build a strong, beautiful Z-Frame Farmhouse Gate that looks like it belongs on a countryside homestead while being tough enough to handle daily use, weather, animals, and heavy traffic for many years.
That means this project must balance two completely different worlds. On one side, there is classic farmhouse aesthetics, natural wood beauty, and charming details. On the other side, there is serious structural engineering, proper bracing, weatherproofing, and hardware that must keep the gate strong and swinging smoothly for decades.
Welcome to this complete journey of building your own Z-Frame Farmhouse Gate.
A few months ago, my neighbor asked me to build a gate for his new farmhouse-style entrance. He wanted something strong, good-looking, and classic — not the cheap metal or weak picket gates you see everywhere. After some research, I chose the Z-Frame design because it is one of the strongest traditional wooden gate styles. That decision led to this detailed build.
Before picking up any tools, there was something very important that had to happen first.
What is a Z-Frame Gate and Why It’s Perfect for Farmhouse Style
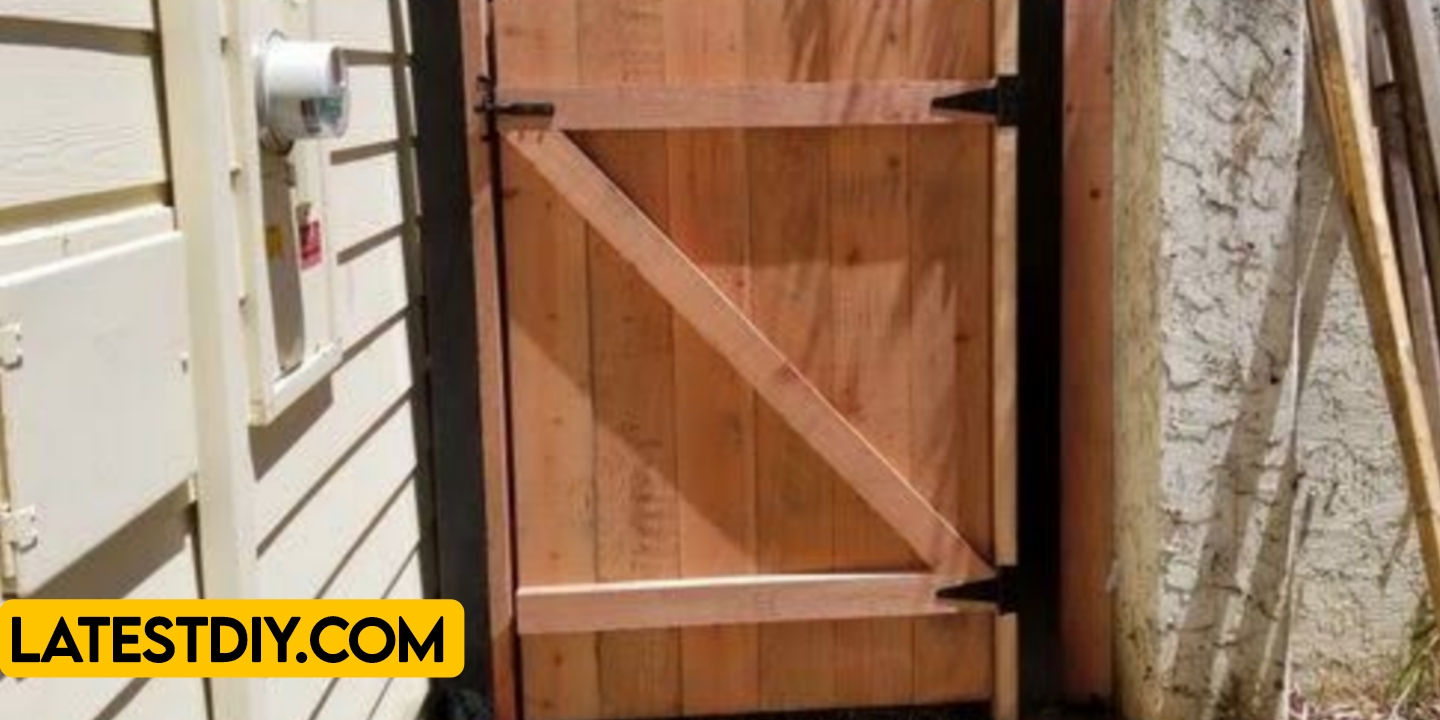
The Z-Frame gate gets its name from the diagonal brace that runs from the bottom of the hinge side to the top of the latch side, forming a “Z” shape. This brace prevents the gate from sagging over time — a very common problem with wooden gates.
Farmhouse style loves this design because it looks rustic, timeless, and handcrafted. It pairs beautifully with live edge fences, cedar posts, stone walls, and natural landscapes. Unlike simple frame gates, the Z-brace gives both strength and visual interest.
This gate is ideal for:
- Driveway entrances
- Garden and backyard entrances
- Pasture and livestock gates
- Decorative front yard entrances
Planning and Design Considerations
I measured the opening — 12 feet wide. For such a wide gate, I decided to build a double gate (two 6-foot panels). Each panel would be 6 feet wide and 5 feet 6 inches tall.
Key design decisions:
- 2×6 cedar frame for strength and rot resistance
- 1×6 cedar boards for vertical pickets
- Heavy-duty Z-brace using 2×6
- Decorative top rail with slight arch for beauty
- Black metal strap hinges and slide bolt latch
I drew full-scale plans on paper and calculated every angle of the Z-brace carefully.
Materials and Tools Used
Wood:
- 2×6 cedar (frame and brace) – approximately 120 feet
- 1×6 cedar tongue-and-groove or shiplap boards (70 pieces)
- 4×4 cedar posts for reinforcement
Hardware:
- 3 heavy-duty gate hinges (self-closing option)
- 12-inch slide bolt latch
- Galvanized screws and carriage bolts
- Post anchors and concrete
Finish:
- Exterior wood stain + sealer (dark walnut color)
Tools:
- Table saw, miter saw, circular saw, drill, level, clamps, post hole digger
Total material cost: Around $420–480 for a 12-foot double gate.
Step-by-Step Building Process
Step 1: Building the Main Frame
I started by cutting the outer frame for each panel:
- Two vertical stiles (5’6″ long)
- Top and bottom rails (6′ long)
All corners used half-lap joints reinforced with carriage bolts for maximum strength. I assembled the rectangular frame on a flat surface and checked for perfect squareness multiple times.
Step 2: Installing the Critical Z-Brace
This is the heart of the gate’s strength.
I measured and cut a 2×6 diagonal brace that runs from the bottom hinge side to the top latch side. The angle was approximately 45 degrees. I cut precise half-lap joints where the brace meets the top and bottom rails so it sits flush.
When attached with glue and screws, this brace transfers weight and prevents sagging even when the gate is very wide and heavy.
Step 3: Adding Vertical Pickets
I attached 1×6 cedar boards vertically across the frame. I used a small spacer to keep consistent gaps (about ¼ inch) for drainage and visual appeal. Each board was screwed from the back so no screws are visible from the front.
For extra farmhouse charm, I added a slight arch on the top rail by cutting a gentle curve on the top pickets.
Step 4: Reinforcing and Sanding
I added extra blocking where hinges and latch would attach. Then I spent hours sanding all surfaces smooth, breaking all sharp edges so the gate feels premium.
Step 5: Applying Protective Finish
I applied two coats of high-quality exterior stain with UV protection and water repellent. The dark walnut color made the cedar grain pop beautifully and gave it that rich farmhouse look.
Step 6: Installing Hinges and Hardware
I attached heavy-duty strap hinges using carriage bolts that go all the way through the frame. On the latch side, I installed a strong slide bolt and a padlock hasp for security.
Step 7: Setting the Posts and Hanging the Gate
I dug 36-inch deep holes, set 6×6 cedar posts in concrete, and let them cure for 48 hours. Then I carefully hung both gate panels, adjusting for perfect swing and gap.
Testing the Z-Frame Gate
After installation, I did serious real-world testing:
- Opened and closed 200 times
- Hung on the gate with full body weight (tested sagging)
- Used it in heavy rain and wind
- Drove a truck through multiple times
- Checked alignment after one week
The gate performed perfectly — smooth swing, no sagging, and looked stunning.
Benefits of Building a Z-Frame Farmhouse Gate
- Extremely strong and sag-resistant
- Classic farmhouse aesthetic that never goes out of style
- Long-lasting with proper wood and finish
- Custom size and design possible
- Much cheaper than buying pre-made heavy gates
- Adds value to your property
- Can be built as single or double gate
- Works for both decorative and functional use
- Satisfying project that improves skills
- Beautiful natural wood look
Comparison Table: Z-Frame vs Other Gate Styles
| Feature | Z-Frame Farmhouse Gate | Simple Frame Gate | Metal Farm Gate | Picket Gate |
|---|---|---|---|---|
| Strength & Anti-Sag | Excellent | Poor | Very Good | Average |
| Looks | Rustic & Beautiful | Basic | Industrial | Light & Decorative |
| Durability (Weather) | Very High (cedar) | Medium | High | Medium |
| Cost (12 ft double) | $420–480 | $250 | $600–900 | $300 |
| Weight | Heavy & Solid | Light | Very Heavy | Light |
| Customization | Very High | Medium | Low | Medium |
| Maintenance | Low | High | Medium | Medium |
| Installation Difficulty | Medium | Easy | Hard | Easy |
Challenges I Faced During the Build
- Making perfect half-lap joints on long diagonal brace
- Keeping everything perfectly square on large panels
- Handling heavy gate while hanging
- Achieving consistent gaps between pickets
- Choosing the right hinge size for heavy gate
Every challenge taught me better techniques and made the final gate stronger.
(FAQ)
1. Why is the Z-brace so important?
The Z-brace prevents the gate from sagging under its own weight over time.
2. What wood is best for outdoor gates?
Cedar, redwood, or pressure-treated lumber are the best choices.
3. How wide can I make a Z-Frame gate?
Up to 6 feet per panel is ideal. For wider openings, use double gates.
4. How much did the complete project cost?
Around $450 for a 12-foot double gate including hardware.
5. Can beginners build this?
Yes, if you have basic woodworking skills and patience.
6. How do I prevent the gate from sagging?
Use a proper Z-brace, strong hinges, and set posts deep in concrete.
7. What kind of hinges should I use?
Heavy-duty strap hinges or self-closing farm hinges rated for the gate weight.
8. How long will this gate last?
With cedar and good finish, easily 15–25 years or more.
9. Should I stain or paint the gate?
Stain is better because it shows the natural wood beauty while protecting it.
10. Can I add decorative elements?
Yes — arched top, X-brace accents, metal straps, or carved details look great.
Conclusion
This Z-Frame Farmhouse Gate started as a simple request from a neighbor and turned into one of the most enjoyable and practical projects I have built. Through careful planning, strong traditional joinery, and attention to every detail, we created a gate that is both incredibly strong and beautifully rustic.
A well-built Z-Frame gate does more than just keep things in or out. It becomes a statement piece that welcomes people, adds charm to your property, and stands strong against weather and time. In today’s world of cheap metal and plastic, building something with real wood and traditional techniques brings a special kind of pride.
Whether you need a gate for your driveway, garden, or backyard, the Z-Frame design offers the perfect mix of beauty, strength, and longevity. The process teaches real woodworking skills while giving you a functional piece you will be proud of every single day.
If you have been thinking about building your own farmhouse gate, I highly recommend trying the Z-Frame style. The satisfaction of swinging open a strong, beautiful gate that you built with your own hands is truly unbeatable.
My Opinion
This project reminded me why I love traditional woodworking so much. It is not always about modern gadgets or fancy tools. Sometimes the best builds use simple, time-tested designs like the Z-brace that have worked for hundreds of years. Seeing the gate installed, stained, and swinging smoothly while looking perfect against the farmhouse fence made all the effort worth it. This is the kind of project that makes your home feel more personal and grounded.
I’m Shubham, a professional carpenter with 11 years of experience in the craft. I specialize in turning high-quality wood into custom furniture, durable cabinetry, and precise structural work. For me, woodworking isn’t just a job—it’s about building things that last a lifetime


