In today’s wood story I am taking the mystery out of making your own router plane and I am going to show you how you can turn a simple hex key and some scrap wood into a powerful handmade tool that will leave your customers wondering if you are some sort of wood magician. The best part is it is a lot simpler than it looks. When customers see this DIY wooden router plane they are amazed and they think that you are some sort of wood magician being able to create such a precise tool from basic workshop stuff. But now you know that it just requires time, patience, and a fun combination of scrap wood, a hex key, and a few basic hardware items.
To start this DIY wooden router plane using a hex key I recommend that you begin with a good quality hex key (also called Allen key) – preferably a 6mm, 8mm or 1/4 inch size depending on what size cutter you want. I am going to use a strong hardwood scrap for the body because it holds up better under repeated use. If your scrap is smaller it really does not matter as long as you can shape it comfortably.
For this project there are a few things that I recommend that you do to save yourself some frustration. When you prepare your wood regardless of what type you want to use leave it as thick as possible at first. You do not need to worry too much about little imperfections because chances are we are going to shape and flatten it later on.
So essentially what I started by doing in order to prep my wood is I made sure that all my pieces are nice and flat on the faces and edges. Once the wood is prepared we can begin shaping the body and preparing the hex key blade.
Preparing the Hex Key Blade
I have selected a quality hex key for this build. A cheap one from furniture kits may not hold an edge well so go for a good hardened alloy one if possible.
You will need to modify the hex key to turn it into a proper cutting blade. First I recommend annealing the hex key if you plan to bend or thread it – heat it to cherry red and let it cool slowly. Then grind or file the short end to create a flat cutting edge at a slight bevel, usually around 25-30 degrees for clean cutting in wood.
Having the blade properly shaped is important because when you start using it for cleaning grooves, leveling bottoms of dadoes or making inlays the sharp edge will perform smoothly and create precise results.
I usually grind the hex key on a bench grinder or belt sander carefully, dipping in water often to avoid overheating. Then I hone it on sharpening stones or a Tormek style system to get a razor sharp edge. Some woodworkers even harden and temper it again after shaping for better edge retention.
Two Simple Ways to Build the Router Plane Body
There are two different ways that you can start building this DIY wooden router plane.
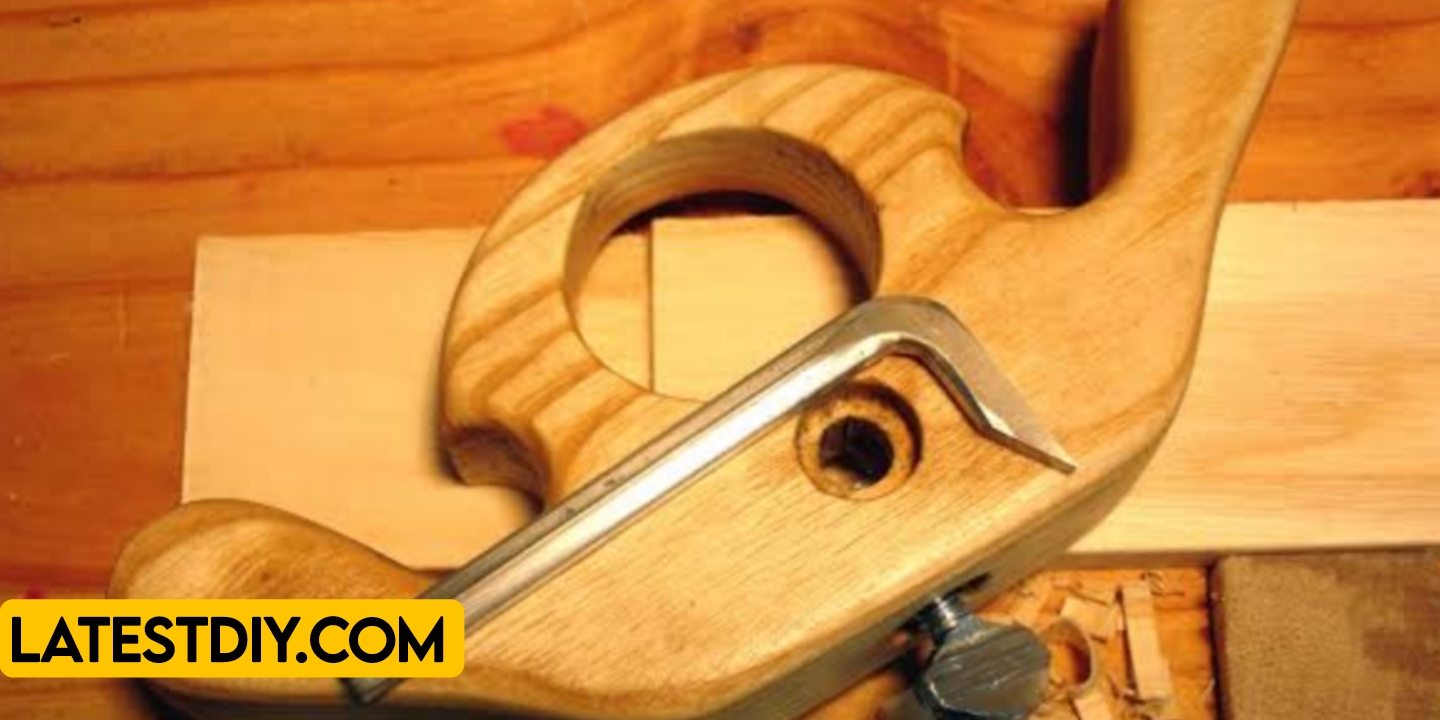
One way is the basic style – take a single block of hardwood about 6 to 8 inches long, 2 to 3 inches wide and 1.5 inches thick. Drill a hole straight through for the hex key to pass through vertically. Then drill a side hole for a bolt or screw that will act as a locking mechanism to hold the blade tight at any depth.
The second way is a more refined version with separate sole and handles for better comfort and control. I am using painters tape or temporary clamps sometimes to test fit before final glue up. Then the body is ready to shape on the bandsaw or with hand tools.
Creating the Blade Slot and Sole
I like to mark the position of the blade slot carefully on the wood as a guide. It does not have to be perfect but it is helpful for knowing where the cutter will sit.
Once you start cutting the slot you want to commit to it. Do not stop halfway through. Just go with the flow and get a nice straight or slightly angled slot even if it is a little different from what you drew. A chisel or coping saw works great for this.
With the slot done I gently sand or file the inside before final assembly. Now comes the interesting part. The hex key blade is inserted through the hole and we test the depth adjustment.
Adding the Locking Mechanism
This is where things get fun. When you take a threaded bolt or screw and drill a perpendicular hole that intersects the blade hole that is when the magic starts happening.
The bolt acts as a setscrew to pinch the hex key firmly in place. Glue is not always needed here but a drop of CA glue or epoxy on non-moving parts can help. It is better to have a little bit too much thread engagement than too little.
One thing to remember is that when you create depth stops or adjustment features you actually need a slightly longer hex key because the curve or adjustment requires more length.
Glue Up and Assembly Process
We are now ready to do the final assembly. I am using one or two clamps for this glue up. I do not recommend rushing because there is too much going on with the precise fits.
Before gluing I made some marks in a few different places so that I remember the alignment. Once everything is dry fitted the parts are glued with tightbond III because it is waterproof and it also has a longer open time which is helpful for these trickier assemblies.
During this process I check the blade alignment multiple times. Once everything looks correct the clamps can be tightened and the router plane body is left to dry fully.
Flattening and Shaping the Sole
After removing the clamps one important step is making sure that the sole of the router plane is completely flat.
If the sole is not flat or if it rocks then it needs to be flattened before continuing. The sole can be taken over to a jointer, hand plane or even sanded on a flat surface with sandpaper on glass to get it nice and flat again.
Every time you adjust or test the tool a little material may need to be removed in order to maintain a perfectly flat sole. This ensures the blade cuts evenly across the width.
Adding Handles and Refinements
Once the basic body is ready it becomes a personal decision whether to stop at the simple version or continue adding handles for better ergonomics.
The more refinements you add the more professional and comfortable the router plane becomes. To create comfortable handles the same steps are repeated – trace the shape, cut on the bandsaw, then shape with rasps, files and sandpaper.
Because of drying and shaping time this process usually takes a few hours to a couple of days depending on how fancy you want to go.
Tips for Best Results
Tip number one: start with the thickest scrap wood that you can get and make one face flat before starting the build.
Tip number two: have all your clamps, bolts and drill bits ready including a quick clamp because it makes assembly much easier.
Tip number three: cut or select the hex key longer than needed otherwise the blade will not have enough adjustment range.
Tip number four: keep extra hex keys ready because they can break or get damaged when you start grinding and shaping.
Tip number five: wipe off excess glue or filing dust immediately after each step.
Tip number six: use a minimum of good quality hardwood for the body and a decent hex key for the greatest performance and visual effect.
Tip number seven: do not rush. Each glue up and sharpening needs proper time before the next step.
Finishing the Router Plane
After shaping and assembly the router plane begins to look complete. At this stage the body is flattened again using a hand plane or sander so that the sole is smooth and straight.
Once the body is flat the edges can be rounded using a hand router or sandpaper for comfortable grip.
The tool is then sanded carefully until it becomes perfectly smooth. Apply a few coats of boiled linseed oil, tung oil or your favorite finish which protects the wood and brings out the natural grain and color.
Benefits of This DIY Wooden Router Plane
| Benefit | Description |
|---|---|
| Unique handmade tool | Creates a custom router plane that fits your hand perfectly |
| Creative woodworking | Combines scrap wood and a simple hex key into a functional precision tool |
| Impressive results | Customers and friends are amazed by the professional looking homemade tool |
| Artistic & practical | Regular workshop scraps become a useful masterpiece tool |
| Cost effective | Made for almost nothing compared to buying a commercial router plane |
| Versatile in use | Great for cleaning grooves, leveling bottoms, inlays and hinge mortises |
Drawbacks
| Drawback | Description |
|---|---|
| Time required | Grinding, shaping and assembly needs patience and several hours |
| Multiple steps | Blade preparation, body shaping, flattening and finishing are required |
| Precision needed | The sole must stay perfectly flat for best cutting performance |
| Blade durability | Hex key steel may not last as long as commercial tool steel blades |
Frequently Asked Questions
What size hex key works best for a DIY router plane?
A 6mm or 8mm (about 1/4 inch) hex key works very well for most small to medium router planes. Larger keys can be used for bigger tools.
Why should I anneal the hex key before shaping?
Annealing makes the steel softer and easier to grind, file or bend without cracking. It prevents the key from breaking during modification.
Why is a flat sole so important?
A perfectly flat sole ensures the blade cuts at a consistent depth and prevents the tool from rocking or digging unevenly.
How do I sharpen the hex key blade?
Grind a bevel on the end, then hone on sharpening stones. Some woodworkers use a Tormek or water stones for a mirror polish edge.
How long should glue dry before using the tool?
Glue should dry for at least 24 hours, preferably longer for full strength, especially with waterproof glues like Titebond III.
Can smaller or softer woods be used?
Yes, smaller scraps will still work but harder woods like oak, maple or walnut give better durability and a nicer finished look.
Why keep extra hex keys ready?
Strips or keys can break, overheat or get damaged during grinding and shaping so having spares saves frustration.
What creates the cutting action in this router plane?
The sharpened end of the hex key acts as the blade. When locked at the right depth it slices wood cleanly as you push or pull the tool.
How many refinements can be added?
The process can be repeated multiple times – you can add depth stops, adjustable fences, ergonomic handles or even multiple blade sizes depending on your needs.
Why do woodworkers like these homemade router planes?
Because the final tool looks complex and artistic yet works just as well as expensive commercial versions for many tasks. Plus it feels satisfying to use something you built yourself.
Conclusion
After several hours of shaping the hex key, cutting the body, gluing, flattening, sanding and finishing the simple scrap wood and hex key slowly transform into a beautiful and highly functional wooden router plane. What started as regular workshop scraps and a common tool becomes something unique and artistic that you will reach for again and again in your projects.
Customers often see this DIY wooden router plane and they are amazed. They think that you are some sort of wood magician being able to create such a precise and useful tool from basic materials.
But the truth is that it just requires time, patience, and a fun combination of scrap wood and a hex key.
My Opinion
When customers see these homemade router planes they often think that creating them must be extremely difficult. But once the process is understood it becomes clear that the real secret is patience, careful preparation, and a willingness to experiment with simple materials.
Regular workshop scraps and a humble hex key can become an incredible precision tool when each step is followed carefully and when the shaping is done one step at a time. This project not only saves money but also gives you a tool that has your own personal touch and story behind it. I highly recommend every woodworker try making at least one – you will be surprised how often you use it and how proud you feel every time you pick it up.
I’m Shubham, a professional carpenter with 11 years of experience in the craft. I specialize in turning high-quality wood into custom furniture, durable cabinetry, and precise structural work. For me, woodworking isn’t just a job—it’s about building things that last a lifetime


