In today’s woodworking story I am taking the mystery out of building a Floating Plywood Bedside Shelf with Hidden Drawer Lock. I am going to show you how you can turn regular sheets of plywood into a sleek modern floating bedside shelf that looks completely normal on the wall but hides a clever secret drawer with a secure lock inside. The best part is it is a lot simpler than it looks. When customers see this floating plywood bedside shelf they are amazed and they think that you are some sort of wood magician being able to hide an entire functional drawer with lock right in plain sight without any obvious handles or gaps. But now you know that it just requires time patience and a fun combination of basic plywood smart joinery tricks and affordable hardware.
This project is perfect for small bedrooms modern minimalist homes or anyone who wants extra bedside storage without taking up any floor space. The floating design gives it that elegant wall-hugging look while the hidden drawer keeps valuables remotes chargers or personal items safely tucked away and locked. Customers often stare at the smooth surface and wonder where the storage is. That moment when you gently press and the hidden drawer smoothly opens is pure magic. And with the lock you add an extra layer of security that makes the whole piece feel premium and thoughtful.
I have built several versions of this floating plywood bedside shelf with hidden drawer lock and every single time people ask me the same question how did you hide that drawer so perfectly. Today I am pulling back the curtain and walking you through every single step so you can make your own. Whether you are a beginner or have some experience this build will leave you feeling like a true wood magician.
What started as ordinary plywood sheets slowly transforms into something unique and artistic through careful cutting precise assembly patient gluing and smart hiding techniques. By the end you will have a beautiful floating shelf that not only looks great but also provides hidden storage with a lock all while impressing everyone who sees it. So grab your tools some good plywood and let’s dive in. This is going to be fun and rewarding.
Why This Floating Plywood Bedside Shelf with Hidden Drawer Lock Stands Out
Before we jump into the actual building steps let me tell you why I love this project so much. First it saves a lot of space. In today’s small bedrooms or apartments a floating design means no legs taking up room on the floor. Second the hidden drawer is incredibly practical. You can keep your phone wallet keys or private items organized and completely out of sight. Third the lock gives real peace of mind especially if you want to secure important things. Fourth it looks expensive and modern. With proper edge banding and finishing plain plywood can look like high-end custom furniture that customers love.
The combination of clean straight lines floating mount and secret compartment creates that wow factor that makes people stop and look twice. Customers see the smooth seamless surface and think it is just a simple shelf but when you show them the hidden drawer with lock their reaction is priceless. That is the wood magician moment I live for every time. And the best thing is it really is not as hard as it seems once you break it down into clear steps with patience.
I recommend starting with good quality three quarter inch thick plywood because it gives enough strength for the floating mount the hidden drawer and the lock mechanism. You can choose birch plywood for a light natural look walnut veneer plywood for richer warmer tones or even paint-grade plywood if you want to add your own color. The key is selecting plywood that stays flat and stable over time unlike solid wood that can sometimes warp.
Materials You Will Need
To build one complete Floating Plywood Bedside Shelf with Hidden Drawer Lock approximately twenty four inches wide eight to ten inches deep and five to six inches tall here is exactly what I gather every time.
Three quarter inch plywood sheet one four by eight sheet is more than enough for one or even two shelves. One quarter inch plywood for the drawer bottom and any back panels if needed. Thin edge banding or solid wood strips for all visible edges. Wood glue I always use Titebond three because it is waterproof and has longer open time. Pocket hole screws or eighteen gauge brad nails for strong assembly. Soft close undermount drawer slides fourteen to sixteen inch length works perfectly. Hidden push to open magnetic latches or a simple key lock mechanism for the drawer security. French cleat system or heavy duty floating shelf brackets for safe wall mounting. Sandpaper in grits from eighty up to two hundred twenty. Wood filler for filling any small gaps. Finish of your choice Danish oil polyurethane or paint. Optional extras like LED strip lights inside the hidden drawer felt pads or decorative edge details.
Do not worry about little imperfections in the plywood at the start. We are going to sand fill and cover most of them as we go along. Leave the material as thick as possible in the beginning because every step of shaping or flattening removes a little bit of material.
Preparing the Plywood
I always begin by breaking down the plywood sheet into manageable pieces using a circular saw with a straight edge guide or a table saw for the cleanest cuts. For this floating plywood bedside shelf I cut the following main pieces.
Top and bottom panels twenty four inches by eight to ten inches two pieces. Side panels matching the height by depth two pieces. Back panel for added structure twenty four inches by four point five inches. Drawer front which also acts as the hidden face drawer sides and drawer back from three quarter inch stock. Drawer bottom cut from one quarter inch plywood.
Make sure all pieces are nice and flat on all sides and edges. Check both faces carefully. If the plywood has any slight bow now is the time to flatten it using weights or a jointer if you have access. A drum sander also works great to bring everything to uniform thickness.
Once the pieces are cut apply edge banding to every visible edge right away. This step is very important because it completely hides the layered look of plywood and makes the final shelf look like solid expensive wood. Iron on edge banding is quick and easy just heat it press it down firmly and trim the excess with a sharp utility knife or edge trimmer. Take your time with this because clean edges make a huge difference in how professional the finished piece looks.
Designing the Hidden Drawer Mechanism
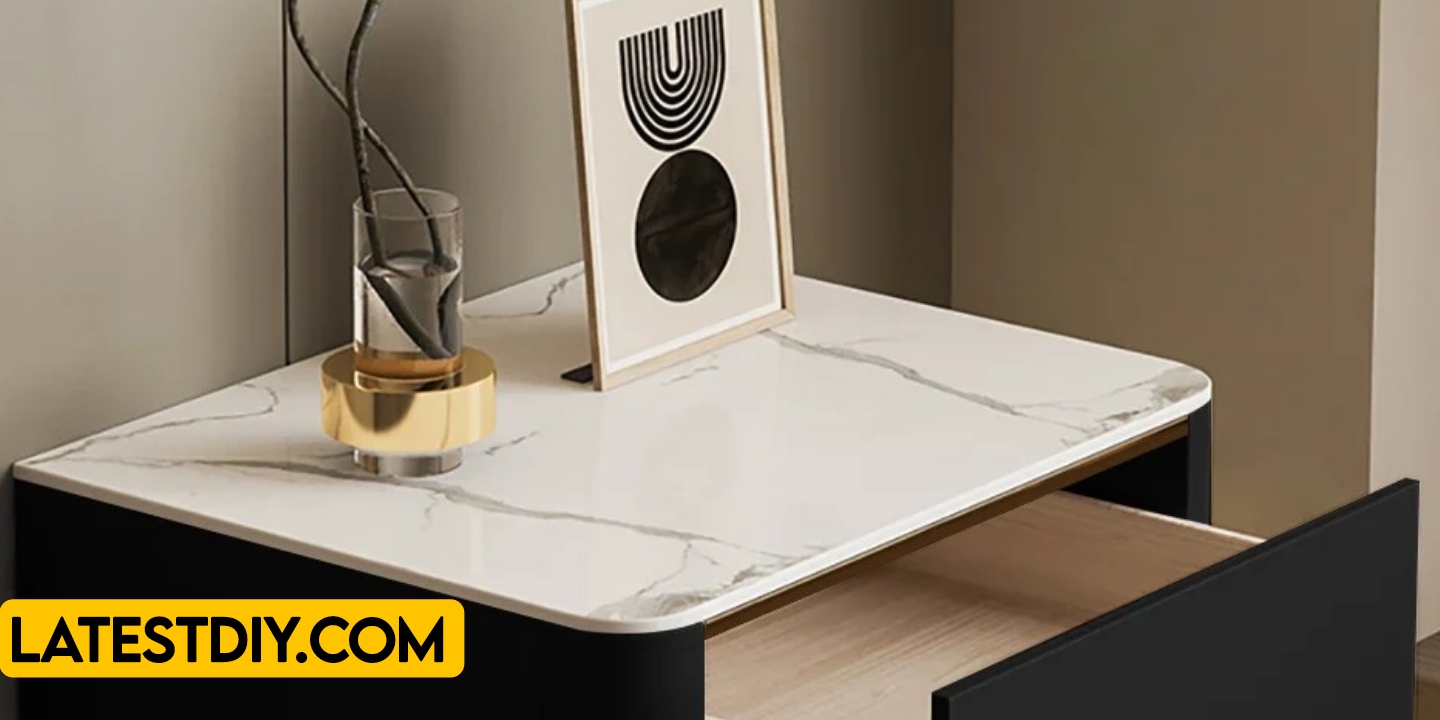
This is where the real magic of the project begins. The hidden drawer in this floating plywood bedside shelf is carefully designed so that the entire front face looks like one solid seamless piece of wood. There are no obvious pulls no visible gaps nothing that gives away the secret until you know exactly where to press.
One very effective way is to make the drawer front flush with the outer shelf face. I use push to open latches or magnetic releases so you simply press gently on the front panel and the drawer smoothly pops open. For the lock part you can install a small magnetic child safety lock or a compact key operated mini lock that engages automatically when the drawer is closed.
I like to trace the drawer outline clearly on the inside of the top and bottom panels first. It serves as a helpful guide. It does not have to be exact but it keeps you on track when cutting and assembling. Once you start the cuts commit to them fully. Do not stop halfway through. Just go with the flow and get a nice smooth fit even if it turns out slightly different from your initial drawing.
With the basic cuts completed I gently sand all the inside surfaces before moving to final assembly. Now comes the interesting part. When you install the drawer slides and test the hidden action that is when you really start feeling the magic of this design.
Two Different Ways to Build the Hidden Drawer
There are two different ways that you can approach this hidden drawer part of the floating plywood bedside shelf project.
One way is to first build the outer shelf carcass as a simple strong box and then create the drawer to fit precisely inside with very minimal clearance. You can even add a second false front layer for extra concealment if you want.
The second way is to build the complete drawer box first with the lock mechanism already installed and then construct the outer floating shelf structure around it. Sometimes I use painters tape with a bit of CA glue underneath to hold pieces temporarily while testing the fit and alignment. Then I move the assembly over to the table saw or band saw for making precise grooves if needed for the slides or lock parts.
Creating the First Hidden Compartment and Lock
I like to mark the exact drawer location on the inside surfaces as a visual guide to follow. Once you begin the assembly commit to the layout you chose. Do not second guess yourself midway.
After the initial cuts and sanding the inside I flip the pieces around and now we have the foundation for two new matching sides ready for the hidden drawer. Adding the lock mechanism is where things get really fun. When you place the locking hardware on both sides of the drawer and the main body that is when the security feature truly comes alive.
Apply glue to the joining surfaces and use clamps to squeeze everything together securely. It is always better to have a little bit too much glue than too little especially in these hidden areas where strength matters most. One important thing to remember is that when creating the floating aspect and tight hidden fit you actually need slightly longer pieces in some directions because the mechanisms and slides require extra clearance for smooth operation.
Glue Up Process
We are now ready to do the main glue up for the floating plywood bedside shelf. I usually use one set of clamps for each major section because there is quite a lot happening with the hidden drawer slides and lock parts all at once. Before applying any glue I make clear alignment marks in several different places so I can remember exactly how everything should line up later.
Once the glue is applied to all the joints the side panels top bottom and back come together forming the outer shell. The hidden drawer is carefully test fitted in the middle section. During this entire process I stick with Titebond three glue because it is waterproof and gives me a longer open time which is extremely helpful for these trickier assemblies that involve moving parts.
Before tightening the clamps all the way it is very important to double check every alignment mark and make sure the hidden drawer slides in and out smoothly without any binding. Once everything looks perfectly correct the clamps can be fully tightened and the whole assembly is left to dry completely.
Flattening the Surfaces After Glue Up
After removing the shelf from the clamps one of the most important next steps is making sure the top surface and all visible faces are completely flat and stable. If the piece rocks even a little or feels wobbly then it must be flattened before continuing any further work.
You can take the assembly over to a jointer to get one face nice and flat again. If a jointer is not available a drum sander or even careful work with a hand plane can achieve the same result. Every time you make adjustments to the hidden drawer or add more features a small amount of material needs to be removed in order to maintain that perfectly flat surface that customers expect from a high quality floating shelf.
Adding More Refinements and Features
Once the first hidden drawer and lock are successfully installed it becomes a personal decision whether to stop there or continue adding more enhancements. The more times you repeat the refinement process the more dramatic and smooth the final action becomes.
To improve the drawer movement you repeat similar careful steps trace any new guide lines if necessary make fine adjustments with the router or sander insert small shims or additional strips where needed and perform another glue up if required. Because of the drying time involved this complete process usually stretches over several days so it is wise to plan your workshop time accordingly and not rush any stage.
Tips for Best Results on Your Floating Plywood Bedside Shelf
Tip number one start with the thickest plywood sheets you can find and make sure one side is perfectly flat before you begin any cutting or assembly.
Tip number two have all your clamps ready including several quick clamps because they make the glue ups around the hidden drawer area much faster and easier.
Tip number three cut all your drawer parts and any filler strips slightly longer than the final needed length otherwise the hidden fit and lock mechanism will end up too tight.
Tip number four keep plenty of extra small plywood strips and shims ready because pieces can shift or crack slightly when you are installing the lock hardware and testing the movement.
Tip number five always wipe off excess glue five to ten minutes after each glue up to prevent any messy squeeze out from showing in the hidden areas or on visible surfaces.
Tip number six use good quality plywood with decent face veneers for the greatest visual effect especially on the floating top and front faces.
Tip number seven do not rush the project at all. Each glue up and hidden drawer fitting needs at least twenty four hours of drying time before you move to the next step.
Finishing the Floating Plywood Bedside Shelf
After completing all the assembly hidden drawer fitting lock installation and final refinements the piece really starts to look complete and impressive. At this stage flatten the entire shelf again using a jointer planer or sander so that both the top and all visible sides are perfectly smooth and straight.
Once the surfaces are flat you can shape the outer edges using a template and router if you want nice rounded corners that feel softer and more modern. The edges can then be further refined with a hand router or sanding block for extra smoothness.
The whole shelf is then sanded carefully moving through progressively finer grits until every surface feels perfectly smooth to the touch. Pay special attention to the hidden drawer front so that it blends seamlessly with the rest of the floating shelf when closed.
The final rewarding step is applying your chosen finish. Danish oil brings out the beautiful natural grain and color of the plywood while polyurethane adds excellent durability and a protective layer against daily use. I usually apply multiple thin coats sanding lightly between each one to achieve the best possible professional looking results that make the piece look like expensive custom furniture.
Benefits of the Floating Plywood Bedside Shelf with Hidden Drawer Lock
| Benefit | Description |
|---|---|
| Space Saving | Floating design frees up valuable floor space in bedrooms |
| Hidden Storage | Secret drawer keeps items neatly organized and out of sight |
| Added Security | Lock mechanism protects personal valuables safely |
| Modern Clean Look | Seamless floating style impresses customers and guests |
| Affordable to Build | Uses common plywood instead of costly solid hardwoods |
| Highly Customizable | Easy to change size finish or add lighting features |
| Strong Wow Factor | People are amazed thinking you are a wood magician when drawer is revealed |
Drawbacks You Should Know About
| Drawback | Description |
|---|---|
| Time Intensive | Multiple glue ups and drying periods spread the build over several days |
| Precision Required | Hidden drawer and lock need careful accurate fitting |
| Several Assembly Steps | Cutting banding gluing installing hardware adds layers of work |
| Weight Limitations | Floating mount has safe load limits depending on wall anchoring |
| Tool Needs | Benefits greatly from having good clamps sander and router |
Frequently Asked Questions
What plywood thickness works best for building this floating bedside shelf with hidden drawer lock
At least three quarter inch plywood is strongly recommended because it provides the necessary strength for both the floating mount and the moving drawer mechanism.
Why is edge banding so important on all visible edges
Edge banding completely hides the layered appearance of plywood and gives the shelf a clean solid wood look that customers find very attractive.
How does the hidden drawer manage to stay completely invisible
By using flush fitting fronts push to open latches and very precise minimal gaps the drawer blends perfectly into the shelf face until you press to open it.
What type of lock is the easiest and most reliable for beginners
Magnetic push to open latches or simple compact key locks are very beginner friendly and work smoothly without complicated installation.
Can this entire project be completed without a table saw
Yes a good circular saw with a straight guide and careful measuring can handle almost all the cuts needed for this build.
How much weight can the finished floating shelf safely hold
When properly mounted into wall studs using French cleats or heavy brackets it can comfortably support twenty to forty pounds depending on the exact setup.
Why should I keep extra plywood pieces and shims ready
Small parts can sometimes shift crack or need minor adjustments during the hidden drawer fitting and lock mechanism installation.
How long should the glue be allowed to dry between major steps
A full twenty four hours is ideal for achieving maximum strength especially when the assembly includes moving drawer parts.
Is it possible to make smaller or larger versions of this shelf
Yes the design scales very easily just adjust all dimensions proportionally while keeping the hidden drawer proportions balanced.
Why do customers and friends love this floating plywood bedside shelf so much
Because the finished piece looks simple elegant and modern but reveals clever hidden storage with a secure lock making it feel like a smart high end custom furniture item.
What finish gives the best appearance on plywood
Danish oil highlights the natural grain beautifully while clear polyurethane provides superior protection and durability for daily use.
Is this project suitable for someone just starting woodworking
Yes it is very suitable for beginners as long as you follow each step carefully and give enough time for drying and fitting without rushing.
Can I add LED lighting inside the hidden drawer
Absolutely adding a small battery powered or wired LED strip inside the drawer creates a beautiful glow when opened and adds even more wow factor.
Conclusion
After many hours of careful plywood preparation detailed cutting patient edge banding multiple glue ups precise hidden drawer construction lock installation thorough sanding and beautiful finishing the ordinary sheets of plywood slowly transform into a stunning floating plywood bedside shelf with hidden drawer lock. What began as flat simple material becomes something truly unique functional and artistic that you can proudly display in any bedroom.
Customers often walk into the room see this shelf mounted cleanly on the wall and they are amazed. They think that you are some sort of wood magician being able to create such a seamless design while hiding a complete working drawer with secure lock right inside it. They run their fingers along the smooth surface searching for any clue and when you finally show them the secret by gently pressing the front the look on their face is unforgettable.
But the truth is that it just requires time patience and a smart combination of basic plywood thoughtful planning and simple affordable hardware. Each step builds upon the previous one and when you follow them carefully with attention to detail regular plywood turns into an incredible space saving masterpiece that serves both beauty and practical purpose every single day.
In my honest opinion when people first see this floating plywood bedside shelf with hidden drawer lock they often assume the build must have been extremely difficult and complicated. But once they understand the step by step process it becomes clear that the real secret lies in patience good preparation and clever design choices. Regular sheets of plywood can become a beautiful modern functional piece of furniture when each cut glue up and refinement is done one careful step at a time from the very first layout to the final coat of protective finish.
This project gives you not only useful bedside storage but also that deep satisfying feeling of knowing you created something clever impressive and truly your own with your hands. The floating look keeps the room feeling open and spacious while the hidden drawer with lock adds smart security and organization. So go ahead gather your plywood and tools take your time and enjoy every part of the build. I promise when someone discovers your hidden drawer and lock for the first time you will smile and feel exactly like the wood magician they think you are
I’m Shubham, a professional carpenter with 11 years of experience in the craft. I specialize in turning high-quality wood into custom furniture, durable cabinetry, and precise structural work. For me, woodworking isn’t just a job—it’s about building things that last a lifetime


